Zabbix integration
This integration ingests events from Zabbix and maps them to APEX AIOps Incident Management events automatically.
This integration was validated with Zabbix 5.4.
Create a new integration in Incident Management
Log in to your Incident Management instance.
Navigate to Integrations > Inbound Integrations > Zabbix.
If necessary, click Add Integration to display the full list of integrations.
Click Add New Integration.
Name the Incident Management Endpoint and enter an API Description based on your business needs. Then click Save.
The UI displays the integration in a new page. The new integration includes a custom endpoint, a set of default mappings to convert Zabbix data to Incident Management events, and a deduplication key to group similar events into alerts. You can now set up Zabbix to send data to this endpoint, as described in the following section. Click Save at the top of the page.
(Optional) Once your endpoint starts receiving data from Zabbix, you can customize how the integration maps and deduplicates this data. To learn more about mapping and deduplication, read Use mapping types in custom integrations and Deduplicate events to reduce noise.
Zabbix setup
To set up Zabbix, do the following:
Define the Incident Management media type
To create a new media type in Zabbix, do the following:
Right click and download the following file, which defines the format of the data that Zabbix will send to Incident Management.
Log in to your Zabbix instance.
Choose Administration > Media Types.
In the Media Types window, click Import in the top-right corner.
Select the file you just downloaded, then click Import. The Incident Management media type now appears as a link in the Media Types list.
Return to the Media Types page, click Incident Management, and specify the API_KEY and URL parameters.
To determine these fields, do the following:
Go to Integrations > Inbound Integrations > Zabbix and click on the integration you created in the Incident Management UI and copy the APEX AIOps Incident Management Endpoint URL. Paste it in the value box next to URL in the parameters section.
Enter your Incident Management API Key in the value box next to API_KEY in the parameters section.
The parameters are auto-defined from the data type file you imported. The
check,description,service,severity, andsourceparameters are required.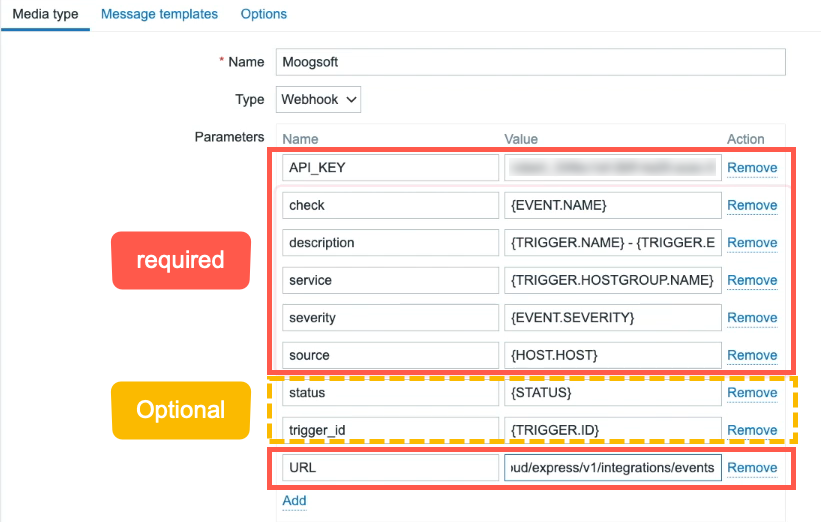
Click Update.
Test the media type and message templates
You should test your media and message settings after setup. Navigate to the Incident Management entry in the Media Types list, then click Test on the right and click test again in the popup.
You should see a "Media type test successful" message, which means that Zabbix sent a payload to Incident Management and got a successful response.
Create a user to receive event notifications
Now you need to create a user that receives Incident Management notifications. Do the following:
Go to Administration > Users.
Click Create User in the upper-right corner. Then specify the following:
Username = Incident Management
Click Select, next to Groups, and select No access to the front end.
Click Password and enter any string.
The password is required to set up the user, but a valid password is not required here. The API key you specified earlier provides the authentication needed to post requests to Incident Management.
Specify the media type for this user:
Click the Media tab. Click add under type.
For Type, select Incident Management.
For Send to, type "N/A".
This field is required but the value is not needed or used for this integration.
Leave the other settings at their defaults and click Add.
Specify the user permissions:
Click the Permissions tab.
For User Type, select Super Admin role.
Click Add.
Define the trigger actions
Now that you have the media type and user defined, you need to define the actions that trigger problem notifications. In this case, you will define one action that sends all notifications to Incident Management.
Do the following:
In Zabbix, go to Configuration > Actions > Trigger actions. Then click Create action in the top-right corner.
For the Name, enter Send to Incident Management.
Optionally, you can filter the events that Zabbix sends: Click Add, under Conditions, and define the specific conditions for sending events.
Send events to Incident Management
To set up Zabbix to send events, do the following:
Click the Operations tab to specify the actions to take when an event, update, or recovery occurs.
In Operations, click Add. The Operation Details popup appears.
In Send to Users, click Add and select the Incident Management user.
In the "Send only to" pulldown, select Incident Management.
Repeat the previous steps for Recovery operations and Update operations.
Click Add.