Use comments with incidents
The APEX AIOps Incident Management Comments feature lets you collaborate with other users and provides a place to share information about an incident. This feature lets you create a general comment, add a resolving step, and send announcements to a list of watchers (added through the Comments panel) associated with the incident. You can add comments, resolving steps, incident watchers, and announcements to any incident you have selected, either on the Incidents page or in the Situation Room.
For general information on the Comments feature, see Comments overview.
Access all comments
To view all comments associated with an incident, including resolving steps:
Navigate to the Incidents page.
Select an incident.
NOTE: You can also access the Situation Room at this step.
Click the Comments icon.
A panel opens, displaying the comments for the incident.
Access resolving steps, announcements, and incident watchers
To view the items of a specific type:
Navigate to the Incidents page.
Select an incident.
NOTE: You can also access the Situation Room at this step.
Do one of the following to select the specific items to view:
Click the Resolving Steps icon.
Click the Announcements icon.
Click the Watchers icon.
A panel opens, displaying the selected items for the incident.
Add a comment
To create a new comment:
Access the comments for an incident.
In the box provided at the bottom of the panel, type the text of your comment.
Only plain text entries are allowed, no formatting or other styling is supported.
Simple hyperlinks are supported.
Click Add Comment.
NOTE: If you navigate away from the Comments panel without clicking Post, then your comment is discarded.
After you click Add Comment, your comment displays with the other comments posted for the selected incident.
Edit a comment
To edit a comment (including resolving steps):
Access the comments or resolving steps for an incident.
Locate the comment you want to change, and click the pencil icon in the comment box.
Click Edit Comment in the menu.
In the text box, make the changes to your existing comment.
Click the check mark (✓) icon to save and display your changes.
Click the X icon to discard your changes.
Note
You can only edit your own comments.
Delete a comment
To delete a comment (including resolving steps):
Access the comments or the resolving steps for an incident.
Locate the comment you want to change, and click the pencil icon in the comment box.
Click Delete Comment in the menu.
A confirmation box displays.
Click Delete to confirm you want to delete the comment.
NOTE: Deleted comments cannot be restored. There is no undo option.
Note
You can only delete your own comments.
Work with resolving steps in the Resolving Steps panel
You can perform the following tasks with resolving steps in the Resolving Steps panel.
Add a resolving step
To add a resolving step for the incident to the existing steps:
Access the resolving steps for an incident.
Click the plus button (+).
In the box that opens, type the text describing the resolving step.
Only plain text entries are allowed, no formatting or other styling is supported.
Simple hyperlinks are supported.
Click Add Resolving Step.
NOTE: If you do not click Add Resolving Step and you navigate away from the Comments panel, your comment is discarded.
Find incidents that are missing information
It is a best practice to include recommended information like resolving steps and root cause feedback for resolved and closed incidents. To see which incidents are missing this information and add it:
Select an incident in the Incidents list with a status of Resolved or Closed.
Check the Resolving Steps icon. A gold circle indicates missing information.
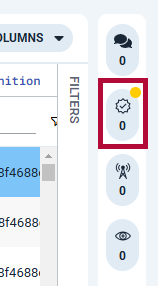
Note that if the gold circle does not display, the incident already includes recommended information.
Click the Resolving Steps icon to open the Resolving Steps pane.
Follow the prompts in the pane and provide the missing incident information.
Identify an existing comment as a resolving step
To mark a comment already associated with an incident as a resolving step:
Access the comments for an incident.
Locate the comment that is a resolving step in the list.
Click Mark resolving step inside the comment.
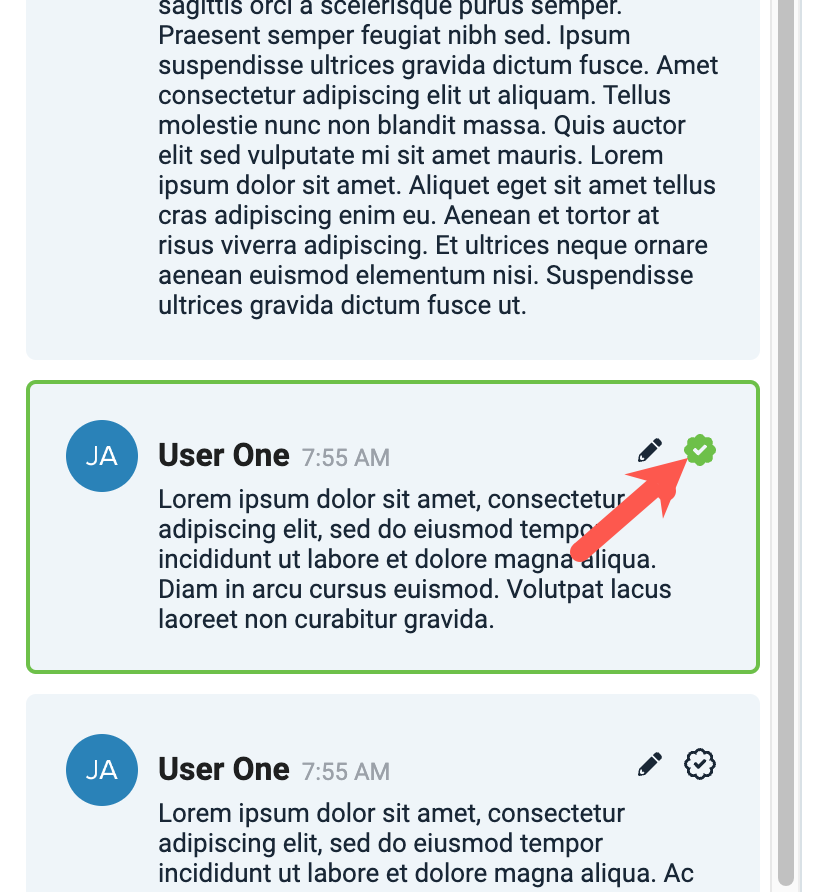
The comment is now a resolving step. The icon turns green, and the comment displays with a green outline.
Revert a resolving step
To remove the resolving step identification from a comment:
Access the comments or the resolving steps for an incident.
Locate the resolving step in the list.
Click the green Mark resolving step icon inside the comment.
The icon turns gray, and the green outline around the step disappears.
The comment is no longer considered a resolving step, and only displays as a regular comment.
Work with incident watchers and announcements
You can perform the following tasks with incident watchers and announcements.
Add a watcher
You can add Incident Management users and groups to a list of watchers who are associated with a particular incident. Watchers receive an email whenever an announcement is added for the incident.
Access the watchers list for an incident.
Click Add Watcher.
Select a user or group from the Recent Users and Groups list, or search for a specific user or group at the top of the dialog.
When you locate the right entity, click the + Add Watcher icon to the right of the name.
Note
Users can add themselves as watchers from the Incidents page. See Understand incidents.
Delete a watcher
Remove an Incident Management user or group from a list of watchers:
Access the watchers list for an incident.
Click the trash can icon to the right of the watcher name.
The watcher is removed from the list.
Add an announcement
Send an email to all of the watchers for a selected incident by sending an announcement:
Access the announcements list for an incident.
In the box provided at the bottom of the panel, type the text of your announcement.
Click Send to N Watchers where N is the number of watchers currently added to the incident.
Your announcement is emailed to all of the watchers for the incident. If there are no watchers for the selected incident, the announcement is added to the list of comments, but no emails are sent.
Note
Because the users on the watchers list receive the announcements in their email, announcement content cannot be deleted or edited.