Usage examples for Actions Menu
Actions Menu allows you to launch workflows and external tools specifically for a single alert or incident.
This topic provides instructions on configuring two use case examples for URL Actions and Set Tags Actions.
URL Actions are useful for generating external links based on incident or alert attributes. For example, a URL Action could help you trigger a search in your company's knowledge base according to a relevant incident attribute.
Set Tags Actions are useful for manually changing tag values for a specific alert or incident, which can then trigger workflows and outbound webhooks. For example, a Set Tags Action can help you trigger a data pipeline workflow that posts a new incident to an external system.
Run Standalone Workflow is used to run standalone workflows on a specific alert or incident. For example, Run Standalone Workflow can help you call a workflow that sets the severity of an alert to Critical.
URL Action example
Suppose that when you view an incident in APEX AIOps Incident Management, you want an easy way to bring up the AWS Service health page that corresponds to the priority of the incident that you are viewing. You can accomplish this by creating a new incident action as follows:
Within Incident Management, navigate to Correlate & Automate > Actions Menu.
Select the Incident Actions tab.
Click Add Incident Action. If this button does not appear, add a new category first by clicking Add Category.
Enter "AWS Status" as the name of the action. Optionally, enter a description.
Fill out the sections on the page as follows:
Under Actions, make sure that URL Action is selected.
Fill out the Endpoint section:
Set Request Method to "POST."
Set Response Display to "Popup."
Set URL to the following:
https://health.aws.amazon.com/health/status?{priority}Skip Base URLs.
Under Headers, make sure there are no headers. Delete the default header.
Leave all remaining sections blank.
Click Save at the top right of the page.
Now, when you right click on an incident in the Incident view, you can trigger the action you created by navigating to Incident Actions > your-category-name > AWS Status. This will open up a webpage that shows the AWS Service health information corresponding to the priority of the incident you are viewing.
For example, if you trigger the action on an incident with a priority of "Clear," then the webpage with the following URL would be opened in your browser:
https://health.aws.amazon.com/health/status?clear
Set Tags Action example
Creating a Set Tags menu action allows users to manually tag alerts or incidents using a configured item on the action menu.
The following example demonstrates how you could use a menu action to add a tag to incidents indicating the estimated effort to resolve them. Users will be able to run the action and respond to a simple prompt.
Navigate to Correlate & Automate > Actions Menu.
Select the Incident Actions tab, and then click Add Incident Action.
Enter a name (required) and a description (optional) for the new action in the spaces provided.
Click Set Tags Action.
In the Set Tags section, enter a value for the tag name and a value for the tag.
This example shows how to add a specific tag to an incident, so the tag value is set to 1.

Note that the tag name uses substitution syntax. Configuring the variable in this way makes it available as a prompt variable in the next section.
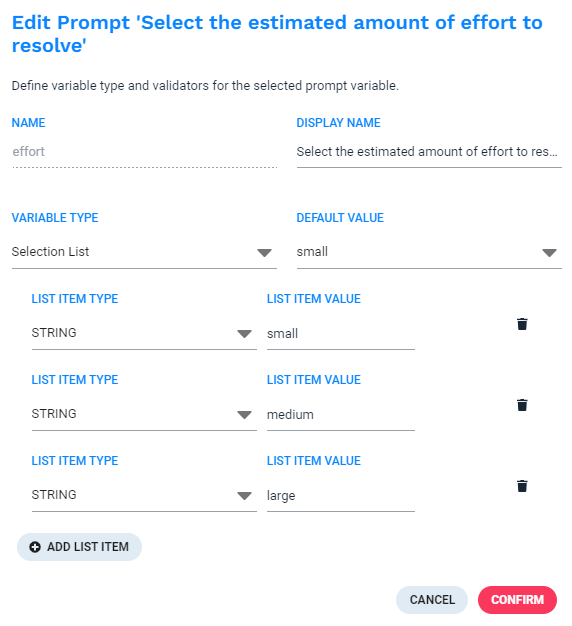
In the Prompt Variables section, click the variable called "effort" to configure it.
Because this action prompts users for input, the Display Name is configured as follows to provide instructions:
Select the estimated amount of effort to resolve
For the purposes of this example, Selection List is selected for the Variable Type. This option allows the action to offer multiple selection options. Three string list items are configured:
small
medium
large
The configuration for the prompt resembles the following image when complete:
Click Confirm to finish configuring the prompt variable.
Click Save to finish configuring the menu action.
The action in use:
Because this is an incident menu action, it is accessible when a user right-clicks an incident on the Incidents page. When the incident is right-clicked and the action selected from the resulting menu, the user is presented with the following:
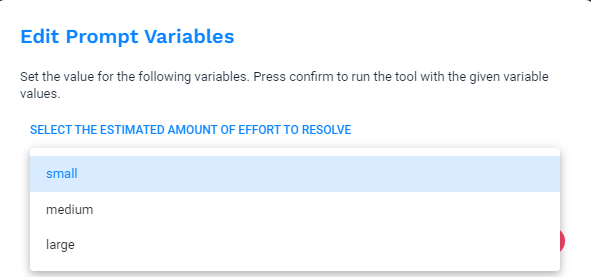 |
If the user selects "small" from the list and then clicks Confirm, the incident is tagged in the following way:
"tags.small":1;
You can use tagging to automate many activities using workflow, such as sending notifications, assigning users, or sending announcements.
Set Tags Action example (ServiceNow)
Note
This example assumes that you have manually configured a ServiceNow integration using an outbound incident webhook and incident workflow according to the instructions in Configure ServiceNow manually. Read the topic to learn how to manually configure a ServiceNow integration.
Suppose that when you view an incident in APEX AIOps Incident Management, you want an easy way to manually raise a ticket for that incident in ServiceNow. You can accomplish this by creating a new incident action, webhook, and workflow as follows:
Within APEX AIOps Incident Management, navigate to Correlate & Automate > Actions Menu.
Click Add Incident Action. If this button does not appear, add a new category first by clicking Add Category.
Enter "Create SNOW Incident" as the name of the action. Optionally, enter a description.
Fill out the sections on the page as follows:
Under Actions, make sure that Set Tags Action is selected.
Under the Set Tags section, create tags with the following
Tag Name,Tag Valuepairs:manuallyTicket,yesmanualTicketPriority,${manualTicketPriority}
Under the Prompt Variables section, click on the
manualTicketPriorityvariable to edit it:For Display Name, enter "manualTicketPriority."
Under Variable Type, select "Selection List."
Add list items with the following
List Item Type,List Item Valuepairs:STRING, P1
STRING, P2
STRING, P3
Click Confirm.
Click Save at the top right of the page.
Create the "ServiceNowManualCreate" webhook:
Navigate to Integrations > Outbound Integrations > Incident Webhook.
At the far right side of the "ServiceNowCreate" webhook, click on the copy icon:

Enter "ServiceNowManualCreate" for the name of the duplicate webhook and click Duplicate.
Click on the "ServiceNowManualCreate" webhook to open it.
Click Edit in the top right of the page.
Under the Triggers section, enable "Tags changed."
Save the webhook.
Create the "Manually Create SNOW Incident" workflow:
Navigate to Correlate & Automate > Workflow Engine, then click the Incident Workflows tab.
Click the Data Pipeline Workflows tab.
Click Add Workflow and enter "Manual Create SNOW Incident" as the name of the workflow. Optionally, provide a description.
For the Trigger, select Update only.
For the Filter, enter the following:
tags.manuallyTicket in ("yes")Click Add Action, select the Send to Endpoint action and then click Add Selected Action.
Select the new Send to Endpoint action and complete each section according to the following:
Webhook: Select the "ServiceNowManualCreate" outbound incident webhook that you created earlier.
External Link: Enable "Add External Link to Outbound tab."
Integration Name: Enter the following: "ServiceNowMgmt"
External ID: Enter the following:
result[0].sys_idExternal Name: Enter the following:
result[0].display_valueURL: Enter the following. Replace
<instanceName>with the name of your ServiceNow instance:https://<instanceName>.service-now.com/nav_to.do?uri=incident.do?sys_id=${outbound.ServiceNowMgmt.external_id}For example:
https://dev84864.service-now.com.nav_to.do?uri=incident.do?sys_id=${outbound.ServiceNowMgmt.external_id}
Click Add Action, select the Set Tags action and then click Add Selected Action.
Select the new Set Tags action and add the following tag value template:
yes,
tags.ticketedManually
Save and Enable the workflow.
Now, when you right click on an incident in the Incident view, you can trigger the action you created by navigating to Incident Actions > your-category-name > Create SNOW Incident. Clicking "Create SNOW Incident" will trigger the incident workflow and webhook to create a new incident in ServiceNow based on the incident you are viewing in APEX AIOps Incident Management.
Run Standalone Workflow Action example
Suppose that you want a quick way to set the severity of a single alert to "Critical" using a menu action. You also want to be able to add a tag to the alert that species the reason for the severity increase.
You can accomplish this by creating a new alert action and a standalone alert workflow.
Create a new standalone alert workflow:
Navigate to Correlate & Automate > Workflow Engine, then click the Alert Workflows tab.
Click the Standalone Workflows tab.
Click Add Workflow and provide a workflow name. Optionally, provide a description.
Click Add Action, select the Set Severity action and then click Add Selected Action.
Set Severity to "Critical."
Click Add Action, select the Set Tags action and then click Add Selected Action.
Under Tag Value Templates, add a new template:
Set the template to the following:
${workflowContext.myValue}Set the output tag to the following:
tags.changeReason
Save the workflow.
Create a new alert action:
Navigate to Correlate & Automate > Actions Menu.
Select the Alert Actions tab.
Click Add Alert Action. If this button does not appear, add a new category first by clicking Add Category.
Enter "Set severity to Critical" as the name of the action. Optionally, enter a description.
Under the Standalone Alert Workflow section, select the standalone alert workflow you created.
Under the Workflow Context (Optional) section, add a new key/value pair:
Set Key to:
myValueSet Value to:
${userValue}
Under the Prompt Variables section, click the
userValuevariable to open it. Make sure the Variable Type is "String." Optionally, set a Default Value, then click Confirm.Click Save at the top of the page to save your action.