Cribl LogStream integration
You can configure Cribl LogStream to send webhook notifications to APEX AIOps Incident Management using custom integrations. A custom integration is a user-defined Incident Management endpoint that ingests JSON payloads and converts them to Incident Management events or metrics. You can define your own mappings for each endpoint based on the payloads you want to send. See Create Your Own Integration.
This integration was validated with Cribl Logstream on December 8, 2021.
Note the following:
An Incident Management custom integration can ingest either events or metrics. Each custom integration has its own separate API key and Cribl-to-Incident Management mappings.
There is no limit to the number of custom integrations you can create.
The following sections provide simple event and metric mappings as examples. The specific mappings you want to define depend on the data you want to send.
Create the Incident Management custom integration
Log in to your Incident Management SaaS instance as an Owner or Administrator.
Choose Integrations > Inbound Integrations > Create Your Own Integration.
If necessary, click Add Integration to display the full list of integrations.
Click Add New Integration and specify the following:
An integration endpoint and description.
The data type to send to the endpoint: Events or Metrics.
The integration setup screen appears with the URL for the new endpoint.
Configure the webhook destination in LogStream
From the top nav of a LogStream instance or Group, select Destinations, then select Webhook from the Data Destinations page's tiles or the Destinations left nav. Click + Add New to open the Webhook > New Destination modal.
In the Configure > General Settings tab, enter or select the following values:
URL: The URL for the new custom integration (copy this from the Incident Management UI).
Method: POST
Format: Custom
Content type: application/json
In the Configure > Advanced Settings tab, go to Extra HTTP Headers and add the following:
Name = apiKey
Value = Your Incident Management API key.
Click Save, then Commit & Deploy.
Map Cribl data to Incident Management
The following sections provide simple examples of mapping a Cribl payload to an Incident Management custom integration. Your mappings will differ depending on the data you want to send. However, the following principles apply to all custom mappings:
Incident Management has a defined event schema and metric schema. Each schema includes a set of required fields. Your custom integration must include mappings for all required fields.
You can define custom tags for Cribl fields that do not have Incident Management equivalents.
You can also specify default values in case Cribl sends an object with a missing field.
The Incident Management event schema includes a severity field. You can map Cribl fields and values to Incident Management severities or define a default severity if a payload does not include this information.
Define and validate your event or metric mappings as follows.
Event mapping
The following procedure uses Cribl syslog messages to illustrate how to map Incident Management Cribl payloads to events. The following steps outline the process:
Send a sample payload to Incident Management.
In Cribl, open the config screen for the webhook destination and do the following:
Go to the Test tab.
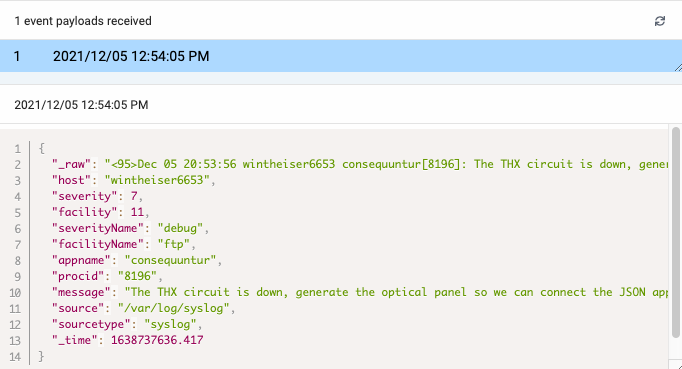
In the Test Input field, define one or more JSON payloads for the Cribl data you want to send. To map syslog events, select syslog.log in the Select Sample pull-down.
Click Test.
Map the event fields.
Go to the Incident Management config screen for the custom integration. Under Map Your Data, you should now see the payload you just sent.
Select the payload and then define your Cribl-to-Incident Management mappings. Your Cribl data will largely determine the mappings you want. See Events Object in the Incident Management API docs.
Here are some reasonable mappings for the syslog payload in this example.
Cribl fields
Incident Management fields
host
source
message
description
appname
service
facilityName
check
severity, severityName
severity
procid
tag.process-id
Map the severities.
The Incident Management event schema has a severity field. You can specify integers or strings, from 0 (“clear”) to 5 (“critical”). Here are some reasonable mappings.
Syslog severity values
Incident Management severity values
0, 1, 2, “emergency”, “alert”, “critical”
Critical (5)
3, “error”
Major (4)
4, “warning”
Warning (2)
6, 7, “informational”, “debug”
Unknown (1)
5, “notice”
Clear (0)
Verify your mappings.
Once you save and apply your mappings in Incident Management, do the following:
Cribl — Return to the Test tab for the webhook destination. Click Test again to send another payload.
Incident Management — Go to the Alerts screen. You should now see a new alert based on the payload you just sent.
Metric mapping
The following procedure uses Cribl syslog messages to illustrate how to map Cribl payloads to Incident Management events.
Send a sample payload to Incident Management.
In Cribl, open the config screen for the webhook destination and do the following:
Go to the Test tab.
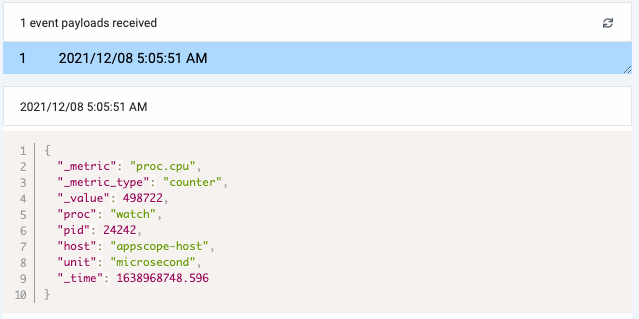
In the Test Input field, define one or more JSON payloads for the Cribl data you want to send. To map syslog events, select appscope-metrics.log in the Select Sample pull-down.
Click Test.
Map the metric fields.
Go to the Incident Management config screen for the custom integration. Under Map Your Data, you should now see the payload you just sent.
Select the payload and then define the Cribl-to-Incident Management mappings you want. Your Cribl data will largely determine your mappings. See Metric Datum Object in the Incident Management API docs.
Here are some reasonable mappings for the AppScope payload you just sent.
Cribl fields
Incident Management fields
_metric
metric
_value
data
host
source
unit
tag.unit
pid
tag.pid
Verify your mappings.
Once you save and apply your mappings in Incident Management, do the following:
Cribl — Return to the Test tab for the webhook destination. Click Test again to send another payload.
Incident Management — Go to the Metrics screen. You should now see a new alert based on the payload you just sent.