Configure JBoss (Wildfly)
Configuring JBoss (WildFly) to function with the JMS LAM has four required steps and one optional step:
Adding the jboss-client jar to Moogsoft Onprem
Creating a user for WildFly application (optional).
Creating a JMS Queue.
Creating a JMS Topic.
SSL Configuration for WildFly (optional).
Add the JBoss Jar to Moogsoft Onprem
The jboss-client.jar has to be added to Moogsoft Onprem to establish a connection with JBoss. Copy the jboss-client.jar to the $MOOGSOFT_HOME/lib/cots/nonDist directory in Moogsoft Onprem.
Note
The jboss-client.jar for Linux can be found in the directory $JBOSS_HOME/wildfly10/bin/client.
Note
The jboss-client.jar for Windows can be found in the directory C:\wildfly10\bin\client
Create a user for WildFly (optional)
Note
If a user is already created and its user credentials are available, then do not add a user for WildFly. The user is required to log into the Administration Console
WildFly is distributed with security enabled for the management interfaces. For adding a queue or topic, a user has to be added for accessing WildFly. To create a user, proceed as follows:
Open a Linux CLI.
Navigate to the bin directory of the extracted WildFly application using the cd command.
Enter the command add-user.sh and pressthe enter key.
Note
For Windows, navigate to the bin directory of the extracted WildFly application using the cd command in command prompt, then enter the command add-user.bat
The following question is displayed:
What type of user do you wish to add?
a) Management User (mgmt-users.properties)
b) Application User (application-users.properties)
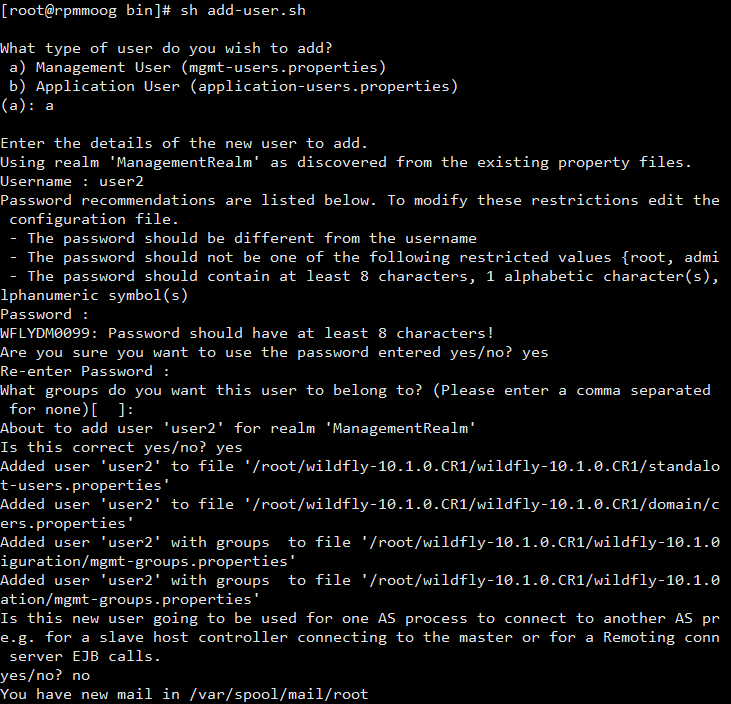
Enter "b" to select application user.
Enter the username, password and retype the password when prompted.
Enter "guest" when the question What groups do you want this user to belong to? (please enter a comma separated list, or leave blank for none) [ ]: is displayed.
Press the enter key when the question About to add user username for the realm ApplicationRealm Is this correct yes/no? is displayed.
Note
You must leave the name of the realm as ApplicationRealm for application user, as it is required for matching the user name in the server configuration.
Enter yes when the question Is this correct yes/no? is displayed and press the enter key.
Enter yes when the question Is this new user going to be used for one AS process to connect to another AS process? is displayed and press the enter key.
Note
The user will be written to the properties files used for authentication and a confirmation message will be displayed
The user for WildFly is added and can be used to log into the Administration Console.
Update Security Realm for the Remote HTTP Connector
Open the
standalone-full.xmlfile.Go to the
domain: remoting subsystemsection.Set
security-realmasApplicationRealmfor each http-connector:<subsystem xmlns="urn:jboss:domain:remoting:XX"> <http-connector name="https-remoting-connector" connector-ref="default-https" security-realm="ApplicationRealm"/> <http-connector name="http-remoting-connector" connector-ref="default" security-realm="ApplicationRealm"/> </subsystem>
Restart the WildFly server.
Create a JMS Queue for WildFly using Linux CLI
The queue can be created using a Linux CLI or by accessing the Administration Console from a browser in Windows or Linux.
To create a queue using Linux CLI:
Navigate to the bin directory of WildFly using the cd command.
Stop the WildFly Server using the following command:
jboss-cli.sh -c --command=:shutdown
Navigate to the configuration folder by entering the following commands:
cd ..
cd standalone/configuration
Open the standalone-full.xml file by using either the vi or the vim editor.
Note
For Windows, navigate to the configuration directory where WildFly is extracted, and open the standalone-full.xml file in a notepad or a wordpad.
Note
Take a backup of the standalone-full.xml file before making any changes.
Find the messaging subsystem section in the standalone-full.xml file:
<subsystem xmlns="urn:jboss:domain:messaging:2.0">
Scroll to the end of the messaging subsystem section and add the following XML after the
</jms-connection-factories>end tag but before the</hornetq-server>element:<jms-destinations> <jms-queue name="testQueue"> <entry name="java:jboss/exported/jms/queue/test"/> </jms-queue> </jms-destinations>The queue name is entered in <jms-queue name>
The JNDI is entered in <entry name>
Save the changes and close the file using the command :wq!.
Navigate back to the bin directory.
Start the server by executing the following command:
./standalone.sh -c standalone-full.xml -b=0.0.0.0 -bmanagement=0.0.0.0
Note
For Windows, to start the WildFly server execute the following command in the command prompt:
standalone.bat -c standalone-full-ssl.xml -b=0.0.0.0 -bmanagement=0.0.0.0
Note
After making the changes to the standalone-full.xml file, copy it to the bin folder and then run the above command.
The JMS queue is created in Wildfly.
Create a JMS Queue for WildFly using the Administration console
Open the welcome screen by entering the URL http://localhost:8080 in a browser, then click on Administration Console.

Alternatively, the Administration Console can also be accessed by entering the URL http://localhost:9990 in a browser.
Enter the username and password of the user defined for WildFly.

Click on Start, adjacent to Create a JMS Queue.
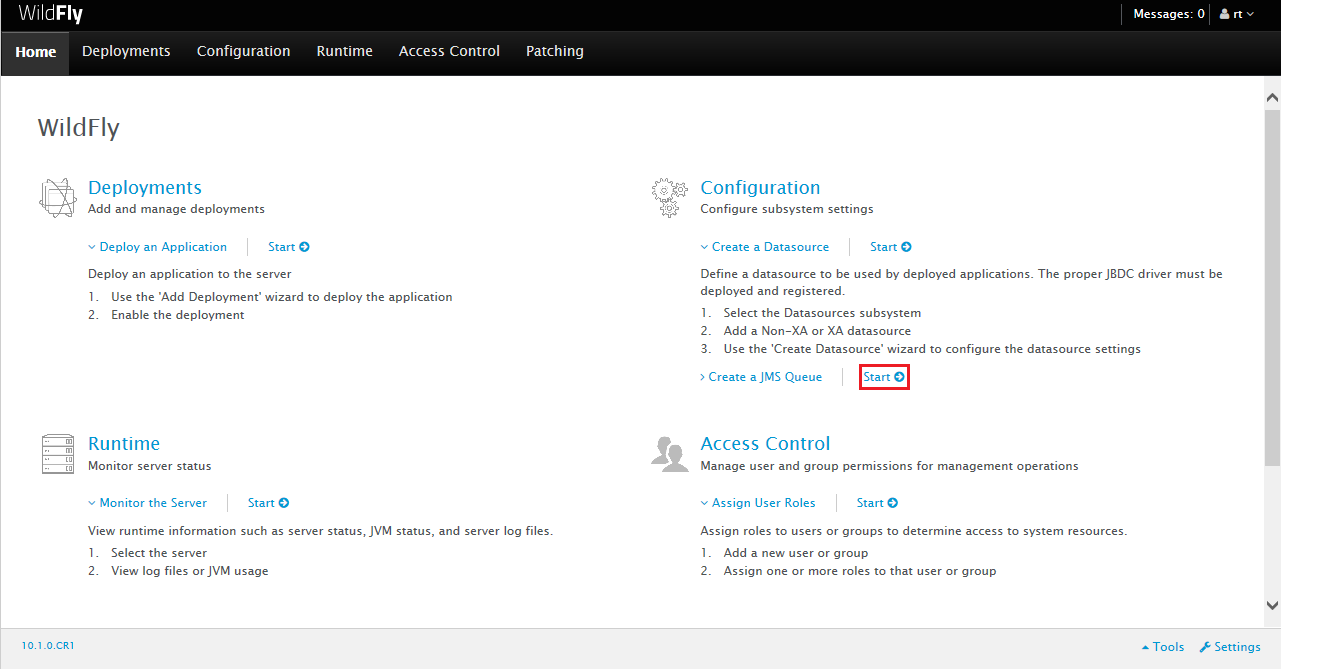
Select Subsystems in the Configuration section, then select Messaging-ActiveMQ in the Subsystem section.
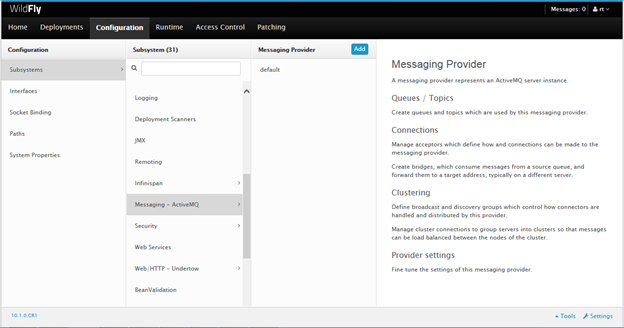
Click on default. The Queues/Topic fieldis displayed.

Click on Queues/Topics. The Messaging Destinations view opens. Click Add in the Queues tab of the JMS Endpoints: Provider default view.
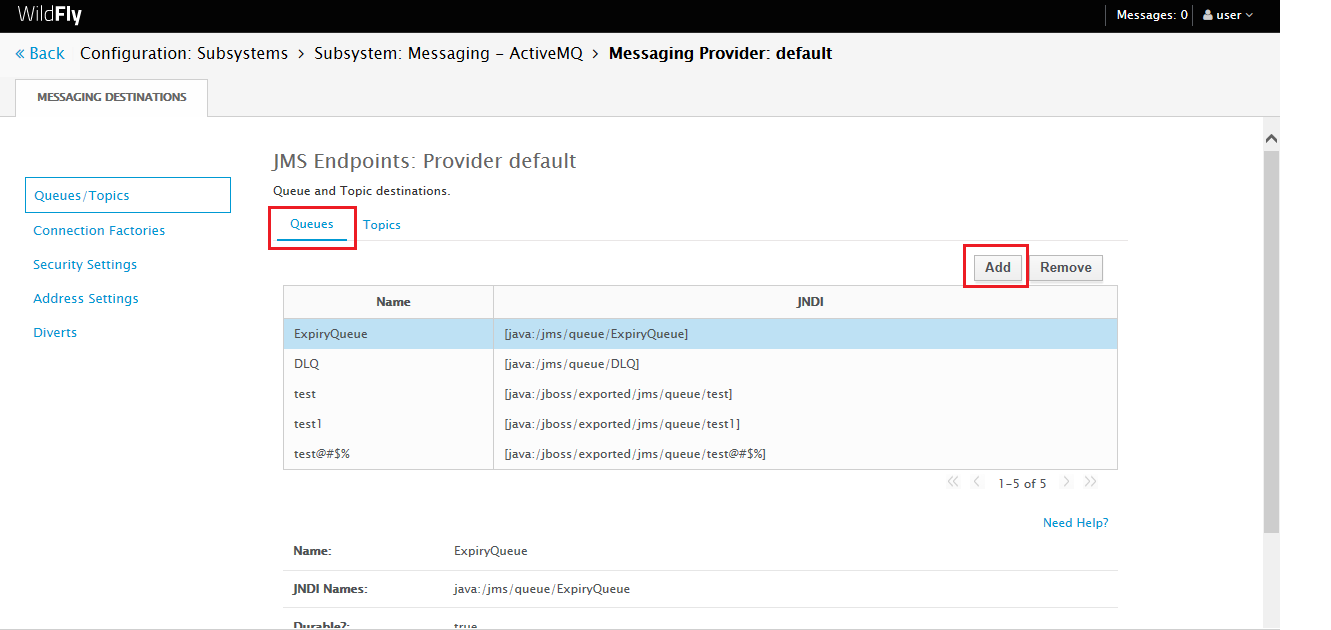
Enter the name of the JMS queue in the Name field, for example, Test_Queue.
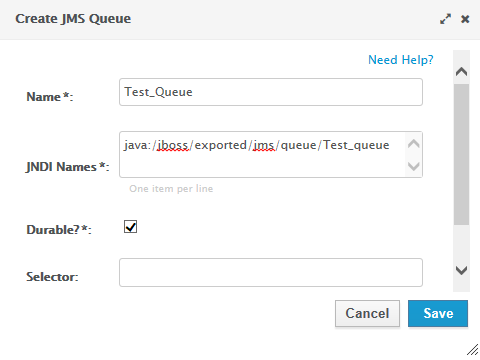
Specify the JNDI Name as java:/jboss/exported/jms/queue/<name of queue>. For example, java:/jboss/exported/jms/queue/Test_Queue.
Note
A queue which needs to be accessed by a remote client should have an entry in the "java:jboss/exported" namespace.
Select the Durable checkbox.
Note
Durable subscription in JMS means that if subscriber is disconnected and then connected again to a JMS destination, then the destination will receive all messages that have been sent to it and have not expired.
Leave the Selector field blank and click Save.
The queue is added and can be viewed in the Queues tab.
Note
For WildFly 8, in the Administration Console, navigate to messaging>Destinations, then click view. Now add the queue as described above.
Create a JMS Topic for WildFly using Linux CLI
The topic can be created using a Linux CLI or by accessing the Administration Console from a browser in Windows or Linux.
To create a topic using Linux CLI, proceed as follows:
Navigate to the bin directory of WildFly using the cd command.
Stop the WildFly Server using the following command:
jboss-cli.sh -c --command=:shutdown
Navigate to the configuration folder by entering the following commands:
cd ..
cd standalone/configuration
Open the standalone-full.xml file by using either the vi or the vim editor.
Note
For Windows, navigate to the directory where wildfly is extracted, and open the standalone-full.xml file in a notepad or a wordpad.
Note
Take a backup of the standalone-full.xml file before making any changes.
Find the messaging subsystem section in the standalone-full.xml file:
<subsystem xmlns="urn:jboss:domain:messaging:2.0">
Scroll to the end of the messaging subsystem section and add the following XML after the
</jms-connection-factories>end tag but before the</hornetq-server>element:<jms-destinations> <jms-topic name="testtopic"> <entry name="java:jboss/exported/jms/topic/test"/> </jms-topic> </jms-destinations>The queue name is entered in <name>.
The JNDI is entered in <entry name>.
Save the changes and close the file using the command :wq!.
Navigate back to the bin directory.
Start the server by executing the following command:
standalone.sh -c standalone-full.xml
Note
For Windows, to start the WildFly server execute the following command in the command prompt:
standalone.bat -c standalone-full.xml
The JMS topic is created in WildFly.
Create a JMS Topic for WildFly using Administration Console
To create a topic by accessing the Administration Console from a browser, proceed as follows:
Open the welcome screen by entering the URL http://localhost:8080/ in a browser, and click on Administration Console.

Alternatively, the Administration Console can also be accessed by entering the URL
http://localhost:9990in a browser.Enter the username and password of the user defined for WildFly.

Click on Start, adjacent to Create a JMS Queue.

Select Subsystems in the Configuration section, and select Messaging-ActiveMQ in the Subsystem section.

Click on default. The Queues/Topic fieldis displayed.

Click on Queues/Topic. The Messaging Destinations view opens. Click on the Add button in the Topics tab of the JMS Endpoints: Provider default view.
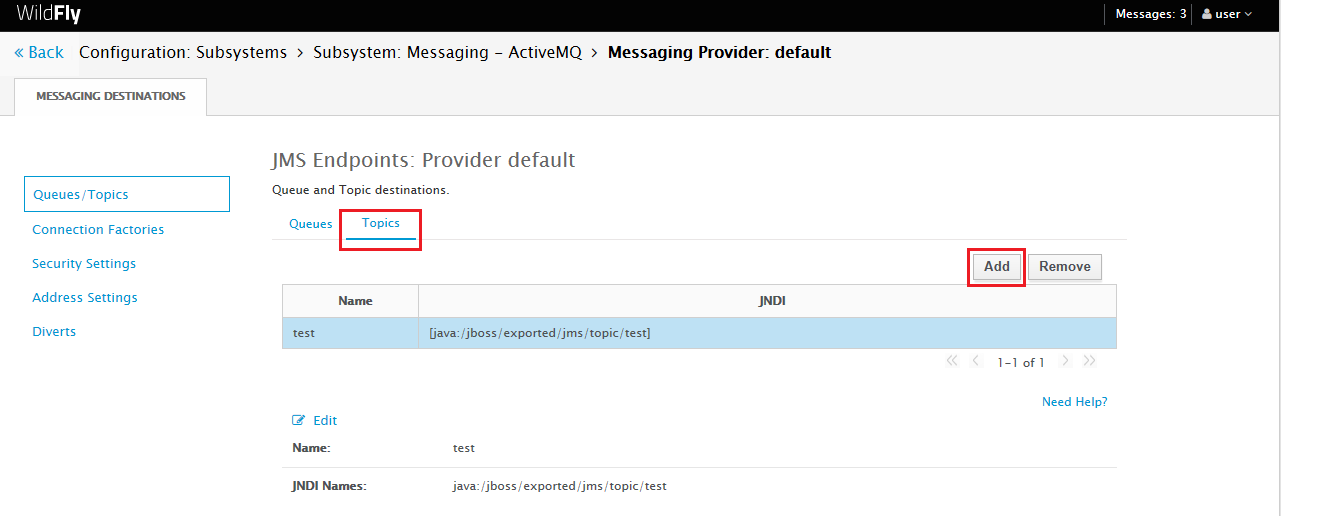
Enter the name of the JMS queue in the Name field e.g. Test_topic.
Specify the JNDI Name as java:/jboss/exported/jms/topic/<name of the topic>. For example,
java:/jboss/exported/jms/topic/Test_topic.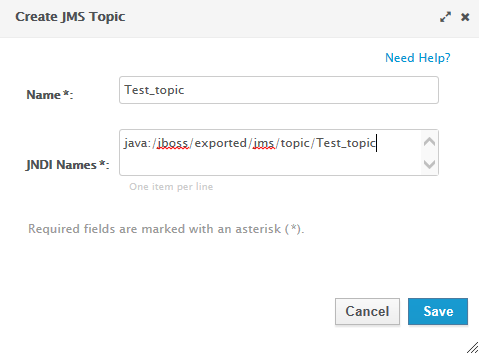
Note
A topic which needs to be accessed by a remote client should have an entry in the "java:jboss/exported" namespace.
Click on Save. The topic is added and can be viewed in the Topics tab.
Note
For WildFly 8, in the Administration Console, navigate to messaging>Destinations, then click on view. Now add the queue as described above.
SSL Configuration for WildFly (optional)
Note
If the SSL configuration is already implemented for JBoss, then this configuration can be skipped.
Note
For JBoss SSL communication the WildFly 8.2.1 version is supported.
Note
The following procedure is same for both Windows and Linux.
Open a Linux CLI and create a folder using the command mkdir SSL.
Navigate to SSL directory using the command cd SSL.
Execute the following commands one by one.
keytool -genkeypair -alias serverkey -keyalg RSA -keysize 2048 -validity 7360 -keystore server.keystore
keytool -genkeypair -alias clientkey -keyalg RSA -keysize 2048 -validity 7360 -keystore client.keystore
keytool -export -alias serverkey -keystore server.keystore -rfc -file server.crt
keytool -export -alias clientkey -keystore client.keystore -rfc -file client.crt
keytool -import -file server.crt -keystore client.truststore
keytool -import -file client.crt -keystore server.truststore
The following files are generated:
client
client.keystore
client.truststore
server
server.keystore
server.truststore
Copy the server.keystore and server.truststore generated in the SSL directory to the configuration directory in JBoss. E.g. wildfly8.2\standalone\configuration.
Go to the configuration folder and find the standalone-full.xml file. Navigate to the <security-realm name="ApplicationRealm">, then enter the below given configuration with the server.keystore and server.truststore password in the Keystore-password field as shown below:
<server-identities>
                    <ssl>
                        <keystore path="server.keystore" relative-to="jboss.server.config.dir" keystore-password="India@123" alias="serverkey" key-password="India@123"/>
                    </ssl>
                </server-identities>
                <authentication>
                    <truststore path="server.truststore" relative-to="jboss.server.config.dir" keystore-password="India@123"/>
                                        .....
                </authentication>
The section should look something like the screenshot given below:

In the <subsystem xmlns="urn:jboss:domain:remoting:2.0"> section add or edit the following configuration er the following example:
<http-connector name="https-remoting-connector" connector-ref="default-https" security-realm="ApplicationRealm"/>
The section should look something like the screenshot given below:

In the <subsystem xmlns="urn:jboss:domain:undertow:1.2"> section add the following configuration:
<https-listener name="default-https" socket-binding="https" security-realm="ApplicationRealm" verify-client="REQUIRED"/>
The section should look something like the screenshot given below:

Restart the WildFly service.
The SSL configuration is completed for JBoss server.