Moogsoft Bridge
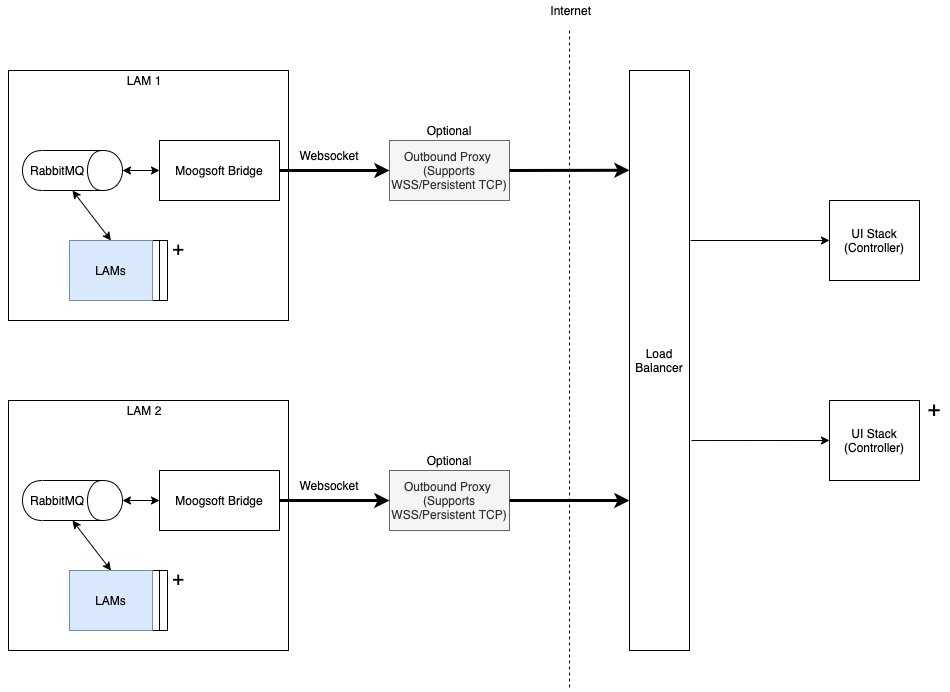
Moogsoft Bridge uses a store and forward architecture to push events and other messages from a local RabbitMQ cluster to the Message Bus.
The connection to the Message Bus is through a WebSocket connection to the Integrations Controller. The Integrations Controller publishes the events directly to the Message Bus. The following diagram shows this process.

Moogsoft Bridge offers the following advantages:
You do not have to open a port for local RabbitMQ clusters or the Message Bus.
You do not need a database.
You will have an outbound HTTP connection with optional proxy support.
Events will persist in local RabbitMQ clusters even if the connection to the Message Bus is disrupted.
If you enable Moogsoft Bridge wherever a server has access to a local RabbitMQ cluster, this increases redundancy if a bridge is killed or loses connection to the local RabbitMQ cluster.
Connection between RabbitMQ and the Message Bus is bidirectional. This means that in a HA installation:
You can send
ha_cntlmessages to your LAMs on a remote LAM server. This means that using the UI stack, you can query your remote LAMs’ status, and activate or deactivate your remote LAMs.Your remote LAMs follow automatic failover across different LAM servers within the same group. You must enable automatic failover in each LAM server's
system.conffor this to take effect.
Before you begin
Before you enable Moogsoft Bridge, verify the following:
You are a Moogsoft Hosted user that needs on-premise data ingestion using LAMs instead of a UI integration.
You have a Moogsoft Hosted production environment that requires event delivery guarantee.
Create a WebSockets authentication token
You create a WebSockets authentication token to use when enabling either WebSockets LAM or Moogsoft Bridge.
You must have the grazer_login and manage_integrations permissions to create a WebSocket authentication token. The Grazer role has these permissions with a new install of Moogsoft Enterprise.
To create a WebSockets authentication token, run the following:
curl -u <username:password> -X POST 'https://<instance>/integrations/api/v1/auth/integrations'
Substitute the username and password of the user with the Grazer role and manage_integrations permission.
See Role Permissions for more information.
Install the required files
Install the Moogsoft Enterprise RPM or TGZ files on the on-premise LAM server that has access to the local RabbitMQ cluster/node. Follow the relevant pre-install steps if they have not already been performed for the chosen Bridge server:
For an online install: Moogsoft Enterprise - Online RPM pre-installation
For an offline install: Moogsoft Enterprise - Offline RPM pre-installation
VERSION=8.2.0; yum -y install moogsoft-integrations-${VERSION}* \
moogsoft-common-${VERSION}* \
moogsoft-utils-${VERSION}* \
moogsoft-mooms-${VERSION}*
Edit the Moogsoft Bridge configuration file
Edit the Moogsoft Bridge configuration file located at $MOOGSOFT_HOME/config/moogsoft_bridge.conf:
{
  "group": <group>,
  "webhost": <base URL>,
  "websocket_token": <WebSockets token>,
  "proxy": {
    "host"    : <Proxy host>,
    "port"    : <Proxy port>,
    "username": <Username of proxy for basic authentication>,
    "password": <Password for the proxy for basic authentication>
  }
}
Substitute in the group, webhost, websocket_token and proxy values:
group: A unique identifier for a local RabbitMQ cluster.You should set up one Bridge for each RabbitMQ node. A cronjob will automatically replace disconnected bridges.
If Moogsoft Enterprise detects a missing bridge, then Moogsoft Enterprise will raise a critical event. If the bridge reappears, Moogsoft Enterprise clears the critical event.
webhost: Your base URL.websocket_token: Your WebSocket token.proxy: An optional object for HTTP communication. The proxy object contains the following parameters:host: Host of the proxy (mandatory).port: Port of the proxy (mandatory).username: Username of proxy for basic authentication (optional).password: Password for the proxy (mandatory if username is used).
Note
If you have two UI servers (as in an HA configuration), both systems must have the same secret_key, otherwise you will see 401 errors when a request goes to the other instance. To avoid this issue, make sure that all UI servers in an HA configuration include the same value for secret_key under the "jwt" section in the controller.conf file.
Start the Moogsoft Bridge process
Run the LAMs initialization utility moog_init_lams.sh --bridge to start the Moogsoft Bridge as a background process.
Running this command also creates a crontab to restart the bridge if it stops.
If all bridges in a group stop, Moogsoft Enterprise creates an event.
Moogsoft Bridge outputs logs to:
/var/log/moogsoft/moogsoft_bridge.logfor root users.$MOOGSOFT_HOME/log/moogsoft_bridge.logfor non-root users.See Configure Logging for more information on logging.
Stop the Moogsoft Bridge process
To stop the Moogsoft Bridge process, you must disable the crontab entry for root and kill the process using the following command:
kill -9 <bridge_PID>Limitations
Please note that LAMs should not be configured with rest_response_mode:event_processed since there is no response when an event is processed by Moogfarmd.