Implement Client Tools
You can create client tools in Moogsoft Enterprise to execute actions through a specified URL. The client tools can send Situation and alert data to the URL.
Client tools can return HTTP response data. The response data includes the HTTP response and HTTP message body. See HTTP Response for more information. Providing a more detailed response in the UI, that includes response status and data, can yield useful and important information. For example, tools to link to an external trouble ticket system (via its URL) can open a new ticket using data from the selected Situation.
There are two client tool types: alert client tools and Situation client tools.
You can make tools available to all users, specified teams, specified roles, or yourself only.
Create a new client tool
To set up a new alert client tool or a new Situation client tool, follow these steps.
Click Alert Client Tools or Situation Client Tools in the Tools section of the Settings tab.
On the Tools tab, click the + icon to create a new tool.
Complete the fields to define the tool:
Field
Input
Description
Name
String (Required)
Name for the Client Tool (up to 100 characters).
Description
String
Text description of the tool.
Context Filter
Filter
Click the pencil icon to create a filter for specific criteria which the alerts or Situations must match for this tool to be available.
Select whether you want to create a URL Tool or if you want to Merge Custom Info.
When creating a client tool, you can enter Situation or alert attributes, and prompt variables, in the URL, Custom Info, and URL Encoded Content fields. For example, you can enter
$descriptionfor the contents of the Situation or alert description field.To create a tool that uses a URL, complete the following fields:
Field
Input
Description
Show All Response Data
Boolean
If enabled, the tool returns a more detailed response in the UI, including the response status and data.
HTTP Method
GET
POST
Select GET if the tool retrieves information or POST if the tool sends information.
Open Window
Boolean
If enabled, this opens a new browser window when using the GET HTTP Method. Disables the Show Response Data option.
If you are creating a tool to perform a GET request against a Graze API endpoint, you cannot open the response in a new window. Select Show All Response Data instead.
URL
String
URL of the Client Tool.
You can add prompt variables. Type '$' and select an existing variable or enter a new variable. If you enter a new prompt variable, see Add prompt variables for details.
If you are creating a tool to connect to the Graze API, the URL must start with
/graze. For example, use/graze/v1/getAlertDetails?alert_id=$alert_idinstead ofhttps://example.com/graze/v1/getAlertDetails?alert_id=$alert_id.URL Formatted Content
String
Payload data to be posted when the tool is run, when using the POST HTTP Method. The payload data must be URL encoded and can include Situation and alert attributes and prompt variables.
To add a prompt variable, type '$' and select an existing variable or enter your own variable. If you enter a new prompt variable, see Add prompt variables for details.
To create a tool that uses custom info fields, enter valid JSON for the custom info you want the tool to add. The JSON can include Situation and alert attributes and prompt variables. For example, the following JSON adds a set of custom info called "TPS data" that contains a string "From system", the Situation ID and the timestamp for when the Situation was created:
{ "TPS data": [ "From system", "$sig_id", "$created_at" ] }To add a prompt variable, type '$' and select an existing variable or enter your own variable. If you enter a new prompt variable, see Add prompt variables for details.
Prompts appear in the Prompts table if you have added them in the URL, URL Formatted Content, or Custom Info fields. See Add prompt variables for details.
On the Shared With tab, select whether you want to share this tool with everyone, specific teams, specific roles or only yourself. You must have the permission
share_filters_publicto share a tool with all users. You must have the permissionshare_filters_teamsto share a tool with specific teams. See Manage Roles for more information.If you select to share the tool with specific teams or specific roles, add the teams or roles you want to share the tool with to the list below.
Click Save Changes to add the tool to the list of alert client tools or Situation client tools in the left hand pane.
Add prompt variables
Prompt variables open a message box when the tool is run, prompting the user to type text, a number, or select from a list.
To add a new prompt variable:
In the URL, URL Formatted Content, or Custom Info fields, enter prompt variables in the following format:
$<prompt_name>
The prompt name cannot be any of the existing Situation or alert attribute names. The prompt name appears in the Prompts table.
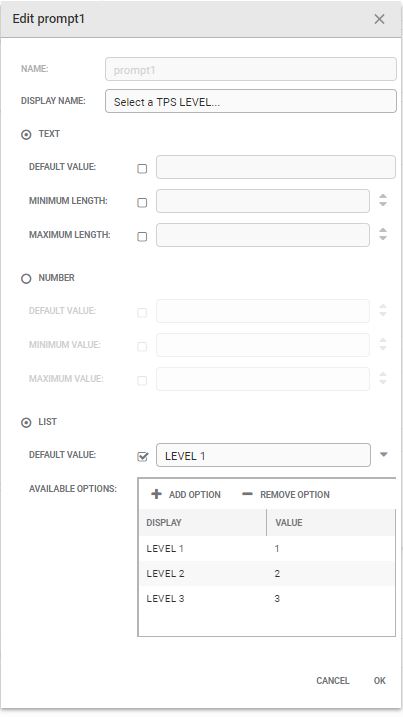
To edit the prompt, double-click on it, or select it and then click Edit Prompt. A new window displays.
Enter a Display Name. This is what appears in the prompt message.
Select whether the user will be prompted for text, a number or a list.
If you select Text or Number, enter the default value and minimum and maximum length of the prompt. Numbers can be integers or floating point, in which case they are truncated to two decimal places.
If you select List, enter the default value and add the available list options.
Click Save Changes to add the new tool appears in the list in the left hand pane.
Client custom info tool example with a prompt variable
You can configure client tools to change custom info fields. For example, you can configure a tool to raise a ticket on a third party system to prompt for entries of pre-defined (custom info) values to provide more information in the ticket.
To create a client custom info tool with a prompt variable, select the Merge Custom Info option:
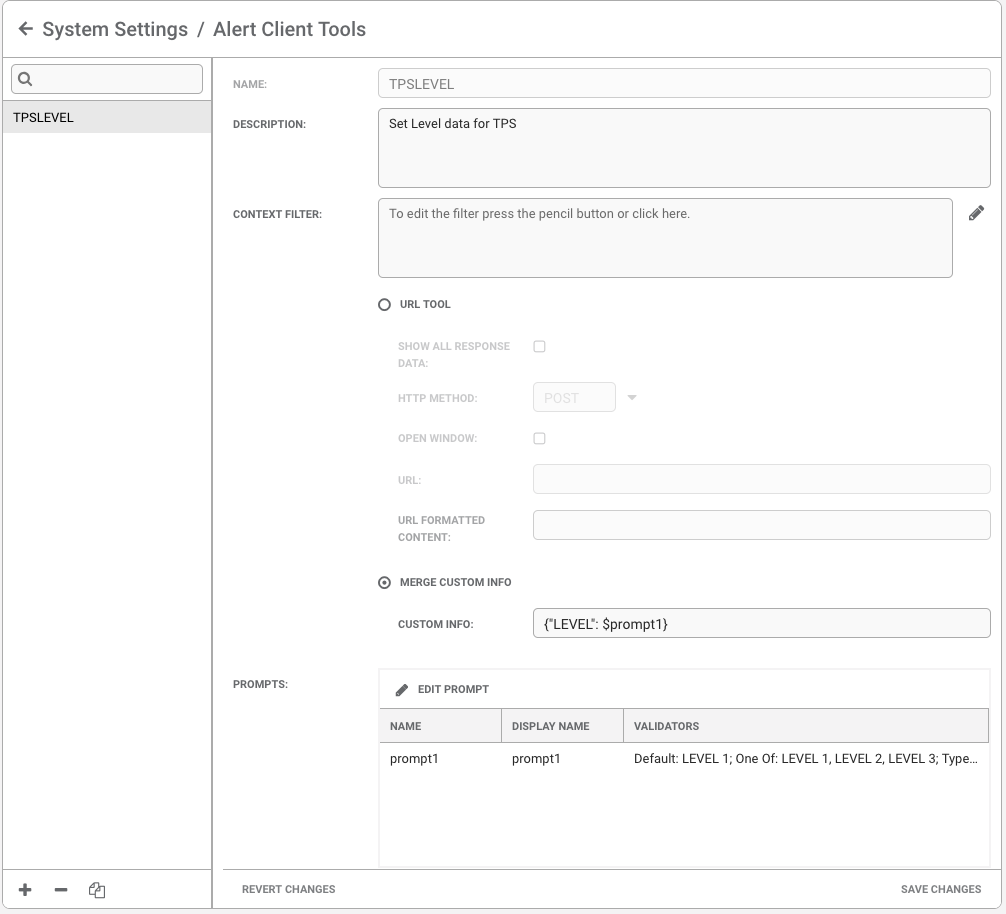
In this example, the custom info is:
{ "LEVEL": $prompt1 }The screenshot below shows how the prompt variable settings can be configured:
Run client tools
The client tools can be accessed from the following areas:
Alert Client Tools: On the Alert Tools Menu, see Alerts Overview (Right-Click menu). Or via "Situation Alerts" in a Situation Room.
Situation Client Tools: The Situation Tools Menu, from the Tools menu on the Situation Room or via ChatOps in the Collaborate tab.
If you want to run client tools using Safari, go to Safari > Preferences > Security and uncheck 'Block pop-up windows' as this is checked by default.
Run client tool example
To run a tool 'Set LEVEL data for TPS':
Go to an alert, right-click or click Tools > Tools > Set LEVEL data for TPS.
The following prompt appears:
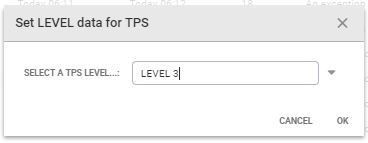
Click OK to run the tool.
To learn more, watch the Client and Server Tool Configuration training video at Moogsoft University. You will need access credentials to view it. Please contact your account manager to receive credentials.