Set Up the Core Role for HA
In Moogsoft AIOps HA architecture, Core 1 and Core 2 run in an active / passive HA pair.
HA architecture
In our distributed HA installation, the Core components are installed on Core 1, Core 2, and Redundancy servers:
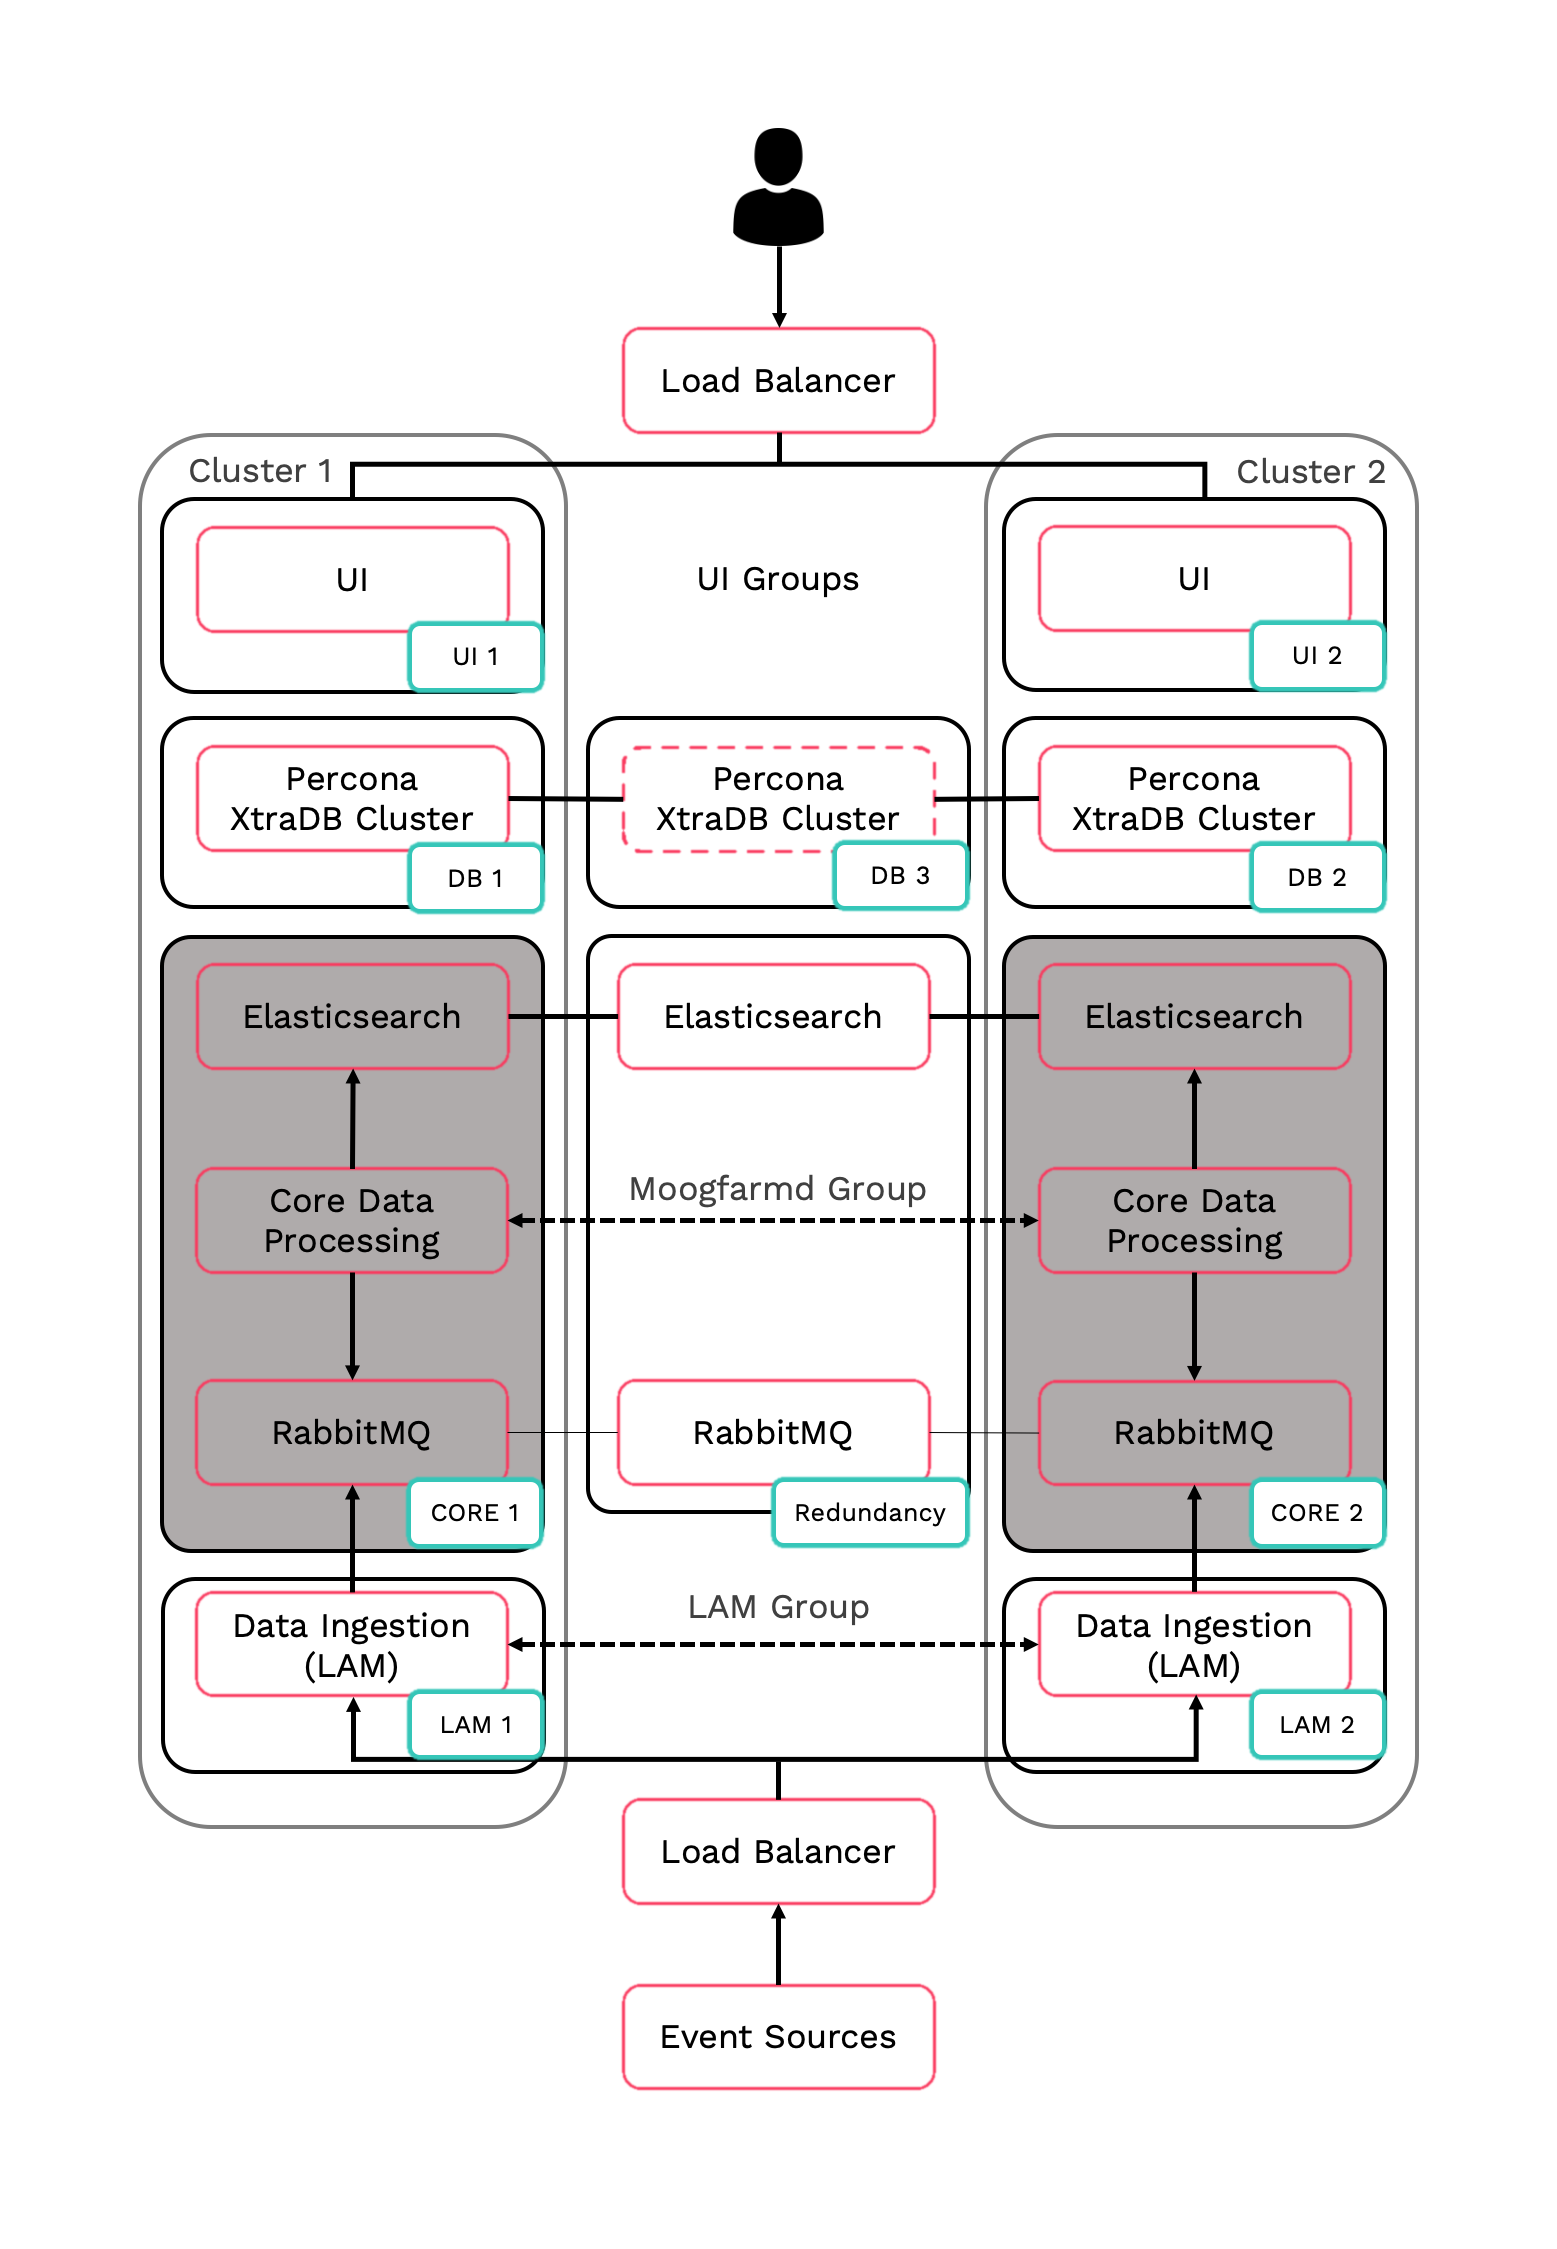
Core 1: Core Data Processing 1 (Moogfarmd), Elastic Node 1, RabbitMQ Node 1.
Core 2: Core Data Processing 2 (Moogfarmd), Elastic Node 2, RabbitMQ Node 2.
Redundancy: Elastic Node 3, RabbitMQ Node 3.
Refer to the Distributed HA system Firewall for more information on connectivity within a fully distributed HA architecture.
Install Core 1
-
Install the required Moogsoft AIOps packages:
VERSION=7.3.1.1; yum -y install moogsoft-server-${VERSION} \ moogsoft-search-${VERSION} \ moogsoft-common-${VERSION} \ moogsoft-mooms-${VERSION} \ moogsoft-integrations-${VERSION} \ moogsoft-integrations-ui-${VERSION} -
Edit your
~/.bashrcfile to contain the following lines:export MOOGSOFT_HOME=/usr/share/moogsoft export APPSERVER_HOME=/usr/share/apache-tomcat export JAVA_HOME=/usr/java/latest export PATH=$PATH:$MOOGSOFT_HOME/bin:$MOOGSOFT_HOME/bin/utils
-
Source the
~/.bashrcfile:source ~/.bashrc
-
Initialize RabbitMQ Cluster Node 1 on the Core 1 server. Substitute a name for your zone.
moog_init_mooms.sh -pz <zone>
-
Initialize, configure and start Elasticsearch Cluster Node 1 on the Core 1 server.
-
Initialize Elasticsearch on Core 1:
moog_init_search.sh
-
Uncomment and edit the properties in the
/etc/elasticsearch/elasticsearch.ymlfile on Core 1 as follows:cluster.name: aiops node.name: <Core 1 server hostname> ... network.host: 0.0.0.0 http.port: 9200 discovery.zen.ping.unicast.hosts: [ "<Core 1 server hostname>","<Core 2 server hostname>","<Redundancy server hostname>"] discovery.zen.minimum_master_nodes: 1 gateway.recover_after_nodes: 1 node.master: true
The minimum and maximum JVM heap sizes must be large enough to ensure that Elasticsearch starts.
See Finalize and Validate the Install for more information.
-
-
On Core 1, edit
$MOOGSOFT_HOME/config/system.confand set the following properties. Substitute the name of your RabbitMQ zone, the server hostnames, and the cluster names."mooms" : { ... "zone" : "<zone>", "brokers" : [ {"host" : "<Core 1 server hostname>", "port" : 5672}, {"host" : "<Core 2 server hostname>", "port" : 5672}, {"host" : "<Redundancy server hostname>", "port" : 5672} ], ... "cache_on_failure" : true, ... "search" : { ... "nodes" : [ {"host" : "<Core 1 server hostname>", "port" : 9200}, {"host" : "<Core 2 server hostname>", "port" : 9200}, {"host" : "<Redundancy server hostname>", "port" : 9200} ] ... "failover" : { "persist_state" : true, "hazelcast" : { "hosts" : ["<Core 1 server hostname>","<Core 2 server hostname>"], "cluster_per_group" : true } "automatic_failover" : true, } ... "ha": { "cluster": "PRIMARY" }Restart Elasticsearch:
systemctl restart elasticsearch
-
Uncomment and edit the following properties in
$MOOGSOFT_HOME/config/moog_farmd.conf. Note the importance of the initial comma. Delete the cluster line in this section of the file., ha: { group: "moog_farmd", instance: "moog_farmd", default_leader: true, start_as_passive: false }Start
moog_farmd.conf:systemctl start moogfarmd
-
Install, configure and start HA Proxy on the Core 1 server to connect to Percona XtraDB Cluster.
Install Core 2
-
Install Moogsoft AIOps components on the Core 2 server.
On Core 2 install the following Moogsoft AIOps components:
VERSION=7.3.1.1; yum -y install moogsoft-server-${VERSION} \ moogsoft-search-${VERSION} \ moogsoft-common-${VERSION} \ moogsoft-mooms-${VERSION} \ moogsoft-integrations-${VERSION} -
Edit your
~/.bashrcfile to contain the following lines:export MOOGSOFT_HOME=/usr/share/moogsoft export APPSERVER_HOME=/usr/share/apache-tomcat export JAVA_HOME=/usr/java/latest export PATH=$PATH:$MOOGSOFT_HOME/bin:$MOOGSOFT_HOME/bin/utils
-
Source the
~/.bashrcfile:source ~/.bashrc
-
On Core 2 initialize RabbitMQ. Use the same zone name as Core 1:
moog_init_mooms.sh -pz <zone>
-
Initialize, configure and start Elasticsearch Cluster Node 2 on the Core 2 server.
-
Initialize Elasticsearch on Core 2:
moog_init_search.sh
-
Uncomment and edit the properties of the
/etc/elasticsearch/elasticsearch.ymlfile on Core 2 as follows:cluster.name: aiops node.name: <Core 2 server hostname> ... network.host: 0.0.0.0 http.port: 9200 discovery.zen.ping.unicast.hosts: [ "<Core 1 server hostname>","<Core 2 server hostname>","<Redundancy server hostname>"] discovery.zen.minimum_master_nodes: 1 gateway.recover_after_nodes: 1 node.master: true
The minimum and maximum JVM heap sizes must be large enough to ensure that Elasticsearch starts.
See Finalize and Validate the Install for more information.
-
-
On Core 2, edit
$MOOGSOFT_HOME/config/system.confand set the following properties. Substitute the name of your RabbitMQ zone, the server hostnames, and the cluster names."mooms" : { ... "zone" : "<zone>", "brokers" : [ {"host" : "<Core 1 server hostname>", "port" : 5672}, {"host" : "<Core 2 server hostname>", "port" : 5672}, {"host" : "<Redundancy server hostname>", "port" : 5672} ], ... "cache_on_failure" : true, ... "search" : { ... "nodes" : [ {"host" : "<Core 1 server hostname>", "port" : 9200}, {"host" : "<Core 2 server hostname>", "port" : 9200}, {"host" : "<Redundancy server hostname>", "port" : 9200} ] ... "failover" : { "persist_state" : true, "hazelcast" : { "hosts" : ["<Core 1 server hostname>","<Core 2 server hostname>"], "cluster_per_group" : true } "automatic_failover" : true, } ... "ha": { "cluster": "SECONDARY" }Restart Elasticsearch:
systemctl restart elasticsearch
-
Uncomment and edit the following properties in
$MOOGSOFT_HOME/config/moog_farmd.conf. Note the importance of the initial comma. Delete the cluster line in this section of the file., ha: { group: "moog_farmd", instance: "moog_farmd", default_leader: false, start_as_passive: false }Start
moog_farmd.conf:systemctl start moogfarmd
-
The erlang cookies must be the same for all RabbitMQ nodes. Replace the erlang cookie on Core 2 with the Core 1 erlang cookie located at
/var/lib/rabbitmq/.erlang.cookie. Make the Core 2 cookie read-only:chmod 400 /var/lib/rabbitmq/.erlang.cookie
You may need to change the file permissions on the Core 2 erlang cookie first to allow this file to be overwritten. For example:
chmod 406 /var/lib/rabbitmq/.erlang.cookie
-
Restart the
rabbitmq-serverservice and join the cluster. Substitute the Core 1 short hostname and zone:systemctl restart rabbitmq-server rabbitmqctl stop_app rabbitmqctl join_cluster rabbit@<Core 1 server short hostname> rabbitmqctl start_app
The short hostname is the full hostname excluding the DNS domain name. For example, if the hostname is
ip-172-31-82-78.ec2.internal, the short hostname isip-172-31-82-78. To find out the short hostname, runrabbitmqctl cluster_statuson Core 1. -
Apply HA mirrored queues policy. Use the same zone name as Core 1.
rabbitmqctl set_policy -p <zone> ha-all ".+\.HA" '{"ha-mode":"all"}' -
Run
rabbitmqctl cluster_statusto verify the cluster status and queue policy. Example output is as follows:Cluster status of node rabbit@ip-172-31-93-201 ... [{nodes,[{disc,['rabbit@ip-172-31-82-211','rabbit@ip-172-31-85-42','rabbit@ip-172-31-93-201']}]}, {running_nodes,['rabbit@ip-172-31-85-42','rabbit@ip-172-31-82-211','rabbit@ip-172-31-93-201']}, {cluster_name,<<"rabbit@ip-172-31-93-201.ec2.internal">>}, {partitions,[]}, {alarms,[{'rabbit@ip-172-31-85-42',[]},{'rabbit@ip-172-31-82-211',[]},{'rabbit@ip-172-31-93-201',[]}]}] -
Install, configure and start HA Proxy on the Core 2 server to connect to Percona XtraDB Cluster