Set Up the User Interface Role for HA
The UI role includes the Nginx and Apache Tomcat components. There are also a number of Moogsoft Enterprise webapps (servlets) installed and running within Tomcat, responsible for the following processes:
graze: Graze APImoogpoller: Dynamic updates to UImoogsvr: Services HTTP requestssituation_similarity: Calculates the situation similarity and pushes to UItoolrunner: Services Server Tools
HA architecture
In our distributed HA installation, the UI components are installed on the UI 1 and UI 2 servers.
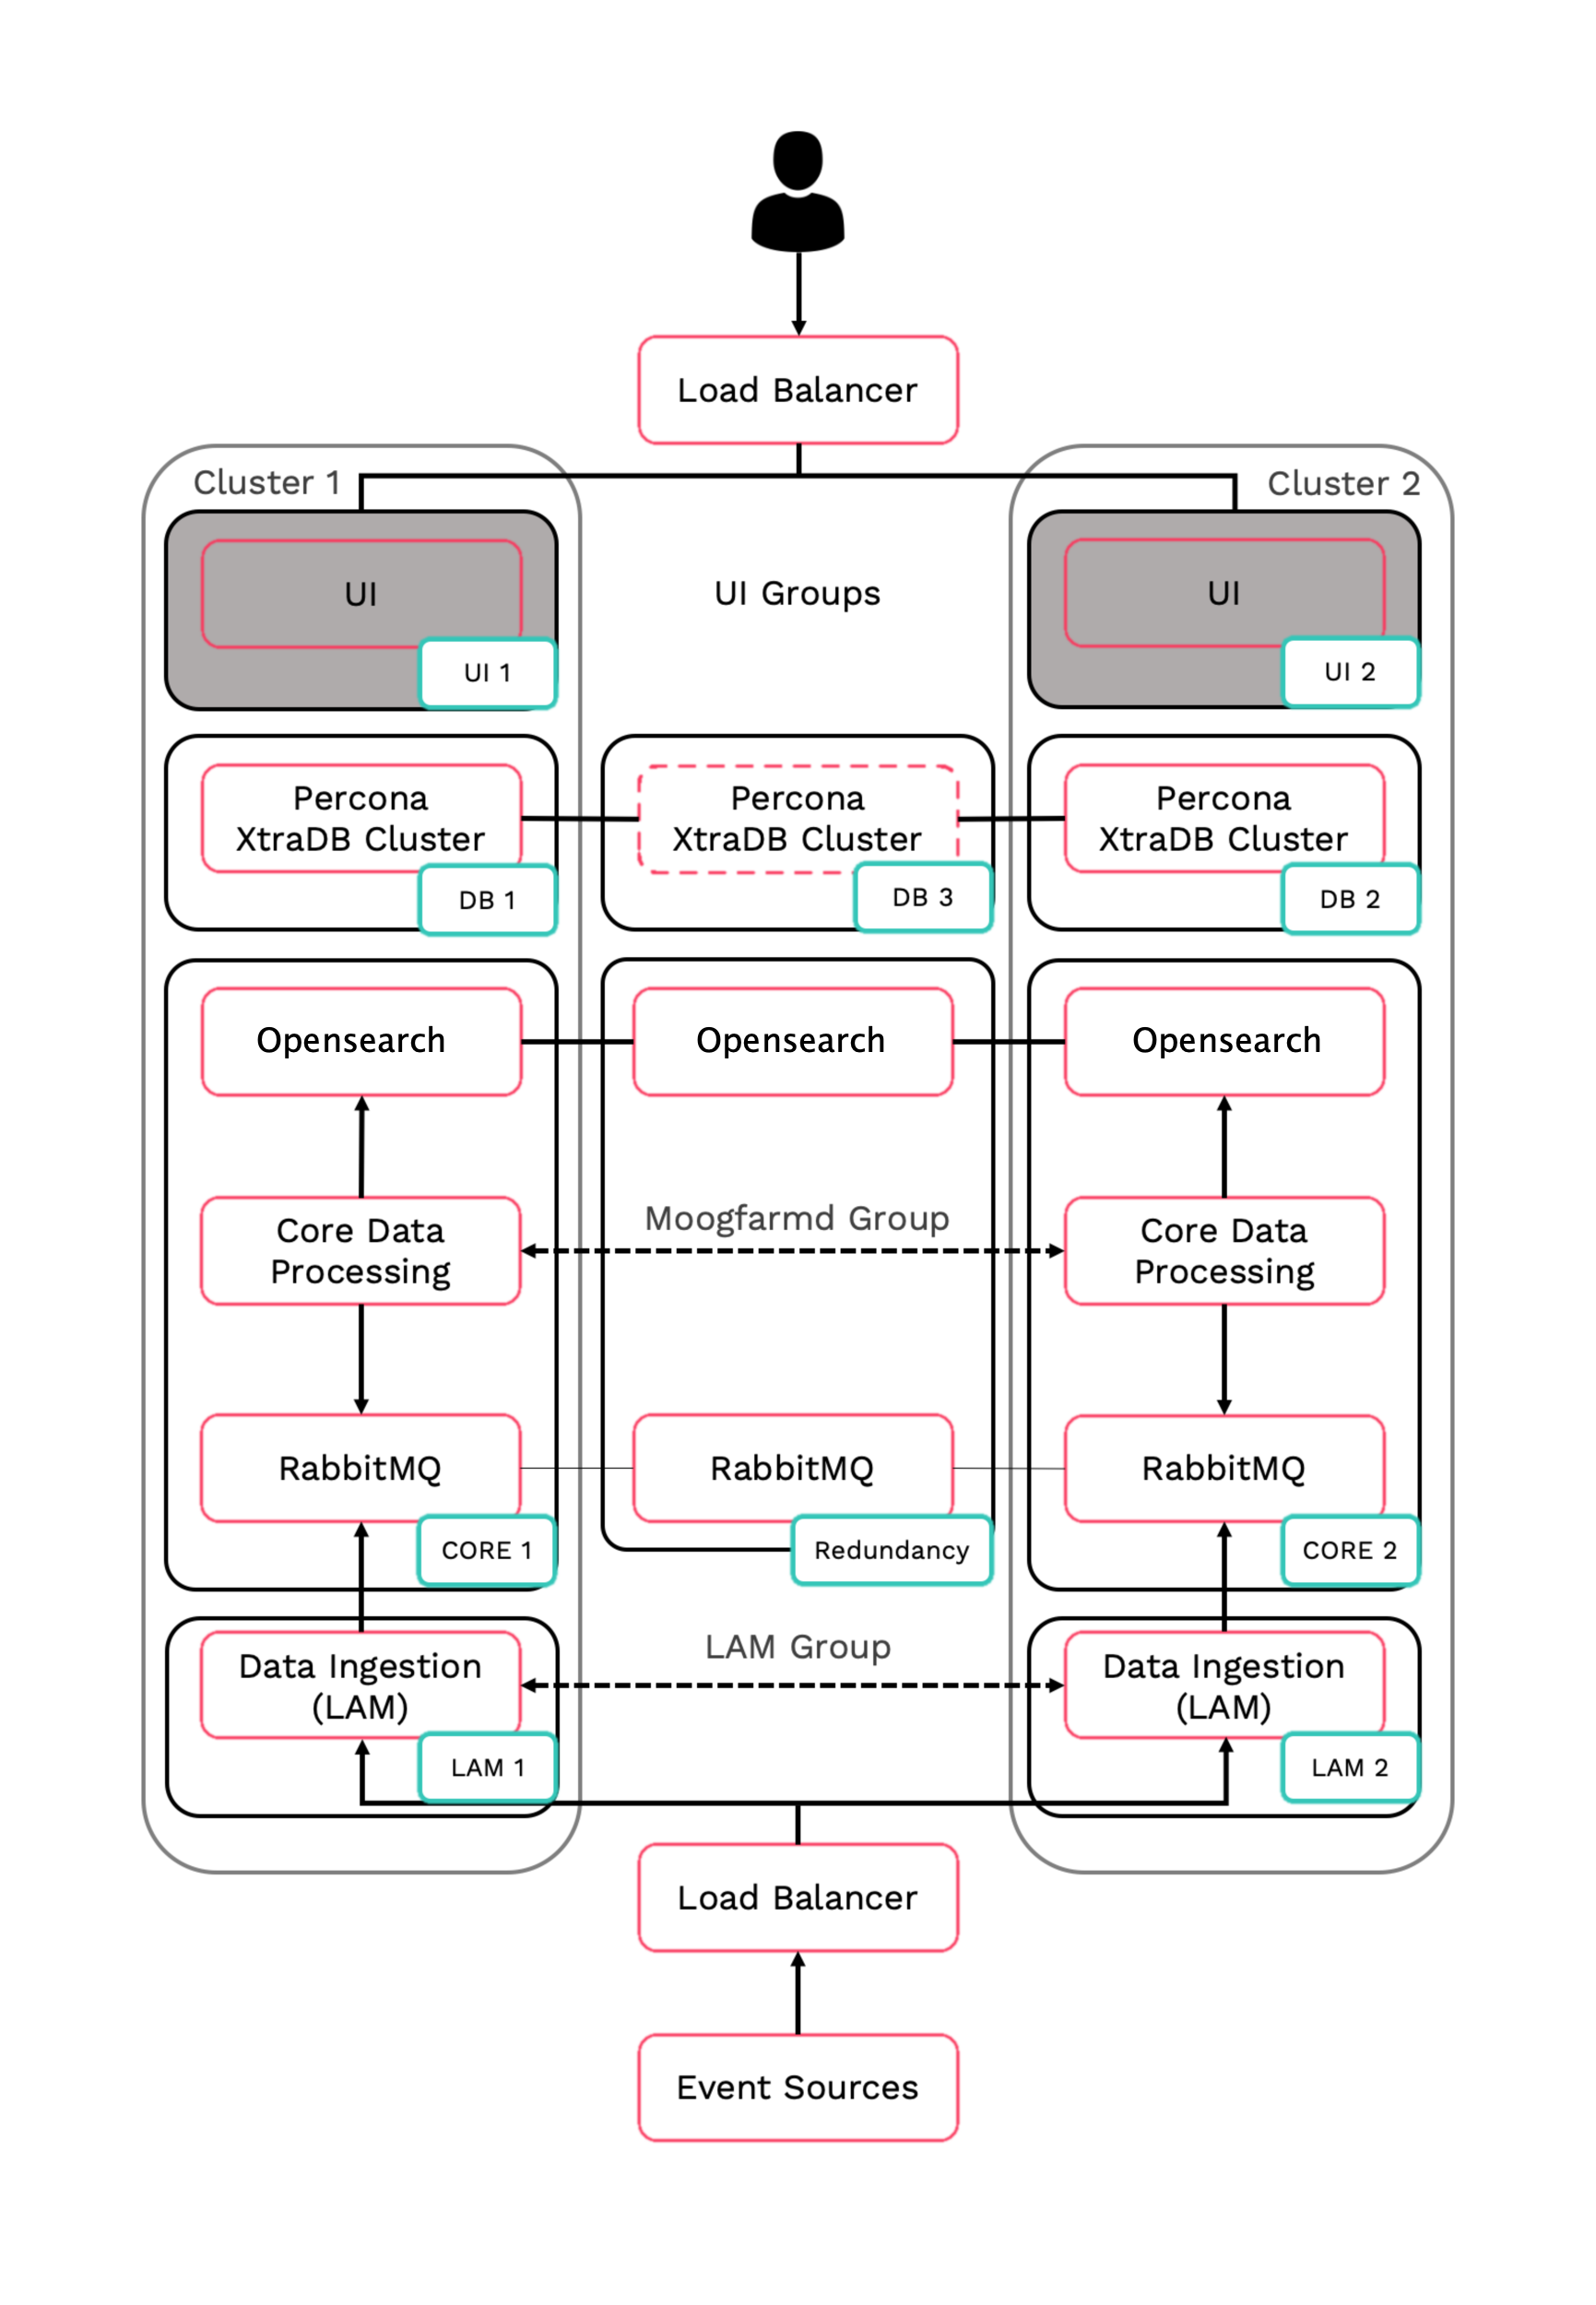
Refer to the Distributed HA system Firewall for more information on connectivity within a fully distributed HA architecture.
Install UI primary
Install Moogsoft Enterprise components on the UI primary server.
On UI 1 install the following Moogsoft Enterprise components:
VERSION=8.2.0; yum -y install moogsoft-common-${VERSION} \
    moogsoft-integrations-ui-${VERSION} \
    moogsoft-integrations-${VERSION} \
    moogsoft-ui-${VERSION} \
    moogsoft-utils-${VERSION}
Edit the
~/.bashrcfile to contain the following lines:export MOOGSOFT_HOME=/usr/share/moogsoft export APPSERVER_HOME=/usr/share/apache-tomcat export JAVA_HOME=/usr/java/latest export PATH=$PATH:$MOOGSOFT_HOME/bin:$MOOGSOFT_HOME/bin/utils
Source the
.bashrcfilesource ~/.bashrc
Run the initialization script
moog_init_ui.shon UI 1 to initialize the UI stack. Substitute the name of your RabbitMQ zone and the Core 1 server hostname:moog_init_ui.sh -twfz <zone> -c <Core 1 server hostname>:15672 -m <Core 1 server hostname>:5672 -s <Core 1 server hostname>:9200 -d <Core 1 server hostname>:3309 -n
Uncomment and edit the servlets settings on UI 1 in the file
$MOOGSOFT_HOME/config/servlets.conf. Note the importance of the initial comma.,ha : { cluster: "primary", instance: "servlets", group: "servlets_primary", start_as_passive: false }On UI 1, edit
$MOOGSOFT_HOME/config/system.confand set the following properties. Substitute the name of your RabbitMQ zone, the server hostnames, and the cluster names."mooms" : { ... "zone" : "<zone>", "brokers" : [ {"host" : "<Core 1 server hostname>", "port" : 5672}, {"host" : "<Core 2 server hostname>", "port" : 5672}, {"host" : "<Redundancy server hostname>", "port" : 5672} ], ... "cache_on_failure" : true, ... "search" : { ... "nodes" : [ {"host" : "<Core 1 server hostname>", "port" : 9200}, {"host" : "<Core 2 server hostname>", "port" : 9200}, {"host" : "<Redundancy server hostname>", "port" : 9200} ] ... "failover" : { "persist_state" : true, "hazelcast" : { "hosts" : ["<Core 1 server hostname>","<Core 2 server hostname>"], "cluster_per_group" : true } "automatic_failover" : true, } ... "ha": { "cluster": "PRIMARY" }On UI 1, restart the Apache Tomcat service:
systemctl restart apache-tomcat
Install, configure and start HA Proxy on UI 1 to connect to the Percona XtraDB Cluster.
Install UI secondary
Install Moogsoft Enterprise components on the UI secondary server.
On UI 2 install the following Moogsoft Enterprise components:
VERSION=8.2.0; yum -y install moogsoft-common-${VERSION} \
    moogsoft-integrations-ui-${VERSION} \
    moogsoft-integrations-${VERSION} \
    moogsoft-ui-${VERSION} \
    moogsoft-utils-${VERSION}
Edit the
~/.bashrcfile to contain the following lines:export MOOGSOFT_HOME=/usr/share/moogsoft export APPSERVER_HOME=/usr/share/apache-tomcat export JAVA_HOME=/usr/java/latest export PATH=$PATH:$MOOGSOFT_HOME/bin:$MOOGSOFT_HOME/bin/utils
Source the
.bashrcfilesource ~/.bashrc
Initialize the UI stack. Run the initialization script
moog_init_ui.shon UI 2 to initialize the UI stack. Substitute the name of your RabbitMQ zone and the Core 2 server hostname:moog_init_ui.sh -twfz <zone> -c <Core 2 server hostname>:15672 -m <Core 2 server hostname>:5672 -s <Core 2 server hostname>:9200 -d <Core 2 server hostname>:3309 -n
Uncomment and edit the servlets settings on UI 2 in the file
$MOOGSOFT_HOME/config/servlets.conf. Note the importance of the initial comma.Caution
The secondary server
groupmust be different to the primary servergroup.,ha : { cluster: "secondary", instance: "servlets", group: "servlets_secondary", start_as_passive: false }On UI 2, edit
$MOOGSOFT_HOME/config/system.confand set the following properties. Substitute the name of your RabbitMQ zone, the server hostnames, and the cluster names."mooms" : { ... "zone" : "<zone>", "brokers" : [ {"host" : "<Core 1 server hostname>", "port" : 5672}, {"host" : "<Core 2 server hostname>", "port" : 5672}, {"host" : "<Redundancy server hostname>", "port" : 5672} ], ... "cache_on_failure" : true, ... "search" : { ... "nodes" : [ {"host" : "<Core 1 server hostname>", "port" : 9200}, {"host" : "<Core 2 server hostname>", "port" : 9200}, {"host" : "<Redundancy server hostname>", "port" : 9200} ] ... "failover" : { "persist_state" : true, "hazelcast" : { "hosts" : ["<Core 1 server hostname>","<Core 2 server hostname>"], "cluster_per_group" : true } "automatic_failover" : true, } ... "ha": { "cluster": "SECONDARY" }On UI 2, restart the Apache Tomcat service:
systemctl restart apache-tomcat
Install, configure and start HA Proxy on UI 2 to connect to the Percona XtraDB Cluster .
Configure the UI load balancer
A user session needs to be served from the same UI stack, ie. they need to stay connected to the same UI server for the duration of their session, or until that UI server becomes unavailable (in which case the load balancer will redirect the user to the secondary). This is because requests are routed via moogsvr and data is received from moogpoller (web sockets).
Configure the UI load balancer with the following attributes:
Since both UI stacks are active you can choose to implement the round robin or least connection balancing method.
Route web traffic only to the Nginx behind which there is an active UI. The decision for this is based on a moogsvr servlet check via the ‘hastatus’ Tomcat endpoint. It will return a 204 if the UI stack is UP. It does not however report on the health of other roles, ie. Core (Moogfarmd, RabbitMQ and Opensearch/Elasticsearch clusters), Database (Percona Cluster), LAMs.
Sticky sessions are preferred. Traffic needs to be routed to the same backend server based on the same MOOGSESS cookie.
You can send the following example cURL command from the command line to check moogsvr servlet status:
curl -k https://server1/moogsvr/hastatus -v