Install LAMs (Moogsoft Hosted)
This topic describes how to install LAMs in a distributed HA system in Moogsoft Hosted. This is a hybrid installation. The core processing is located in the cloud, and the LAMs and event sources are on-premise.
You must enable either Moogsoft Bridge or WebSockets LAMs before you can use the LAMs to enable event delivery:
Moogsoft Bridge uses a store and forward architecture to push events and other messages from a local RabbitMQ cluster to the Message Bus. Moogsoft recommends that you use Moogsoft Bridge in production environments.
WebSockets LAMs enables LAMs to communicate with Moogsoft Hosted using WebSockets instead of RabbitMQ or Moogsoft Bridge. Moogsoft recommends that you use WebSockets LAMs in non-production environments only.
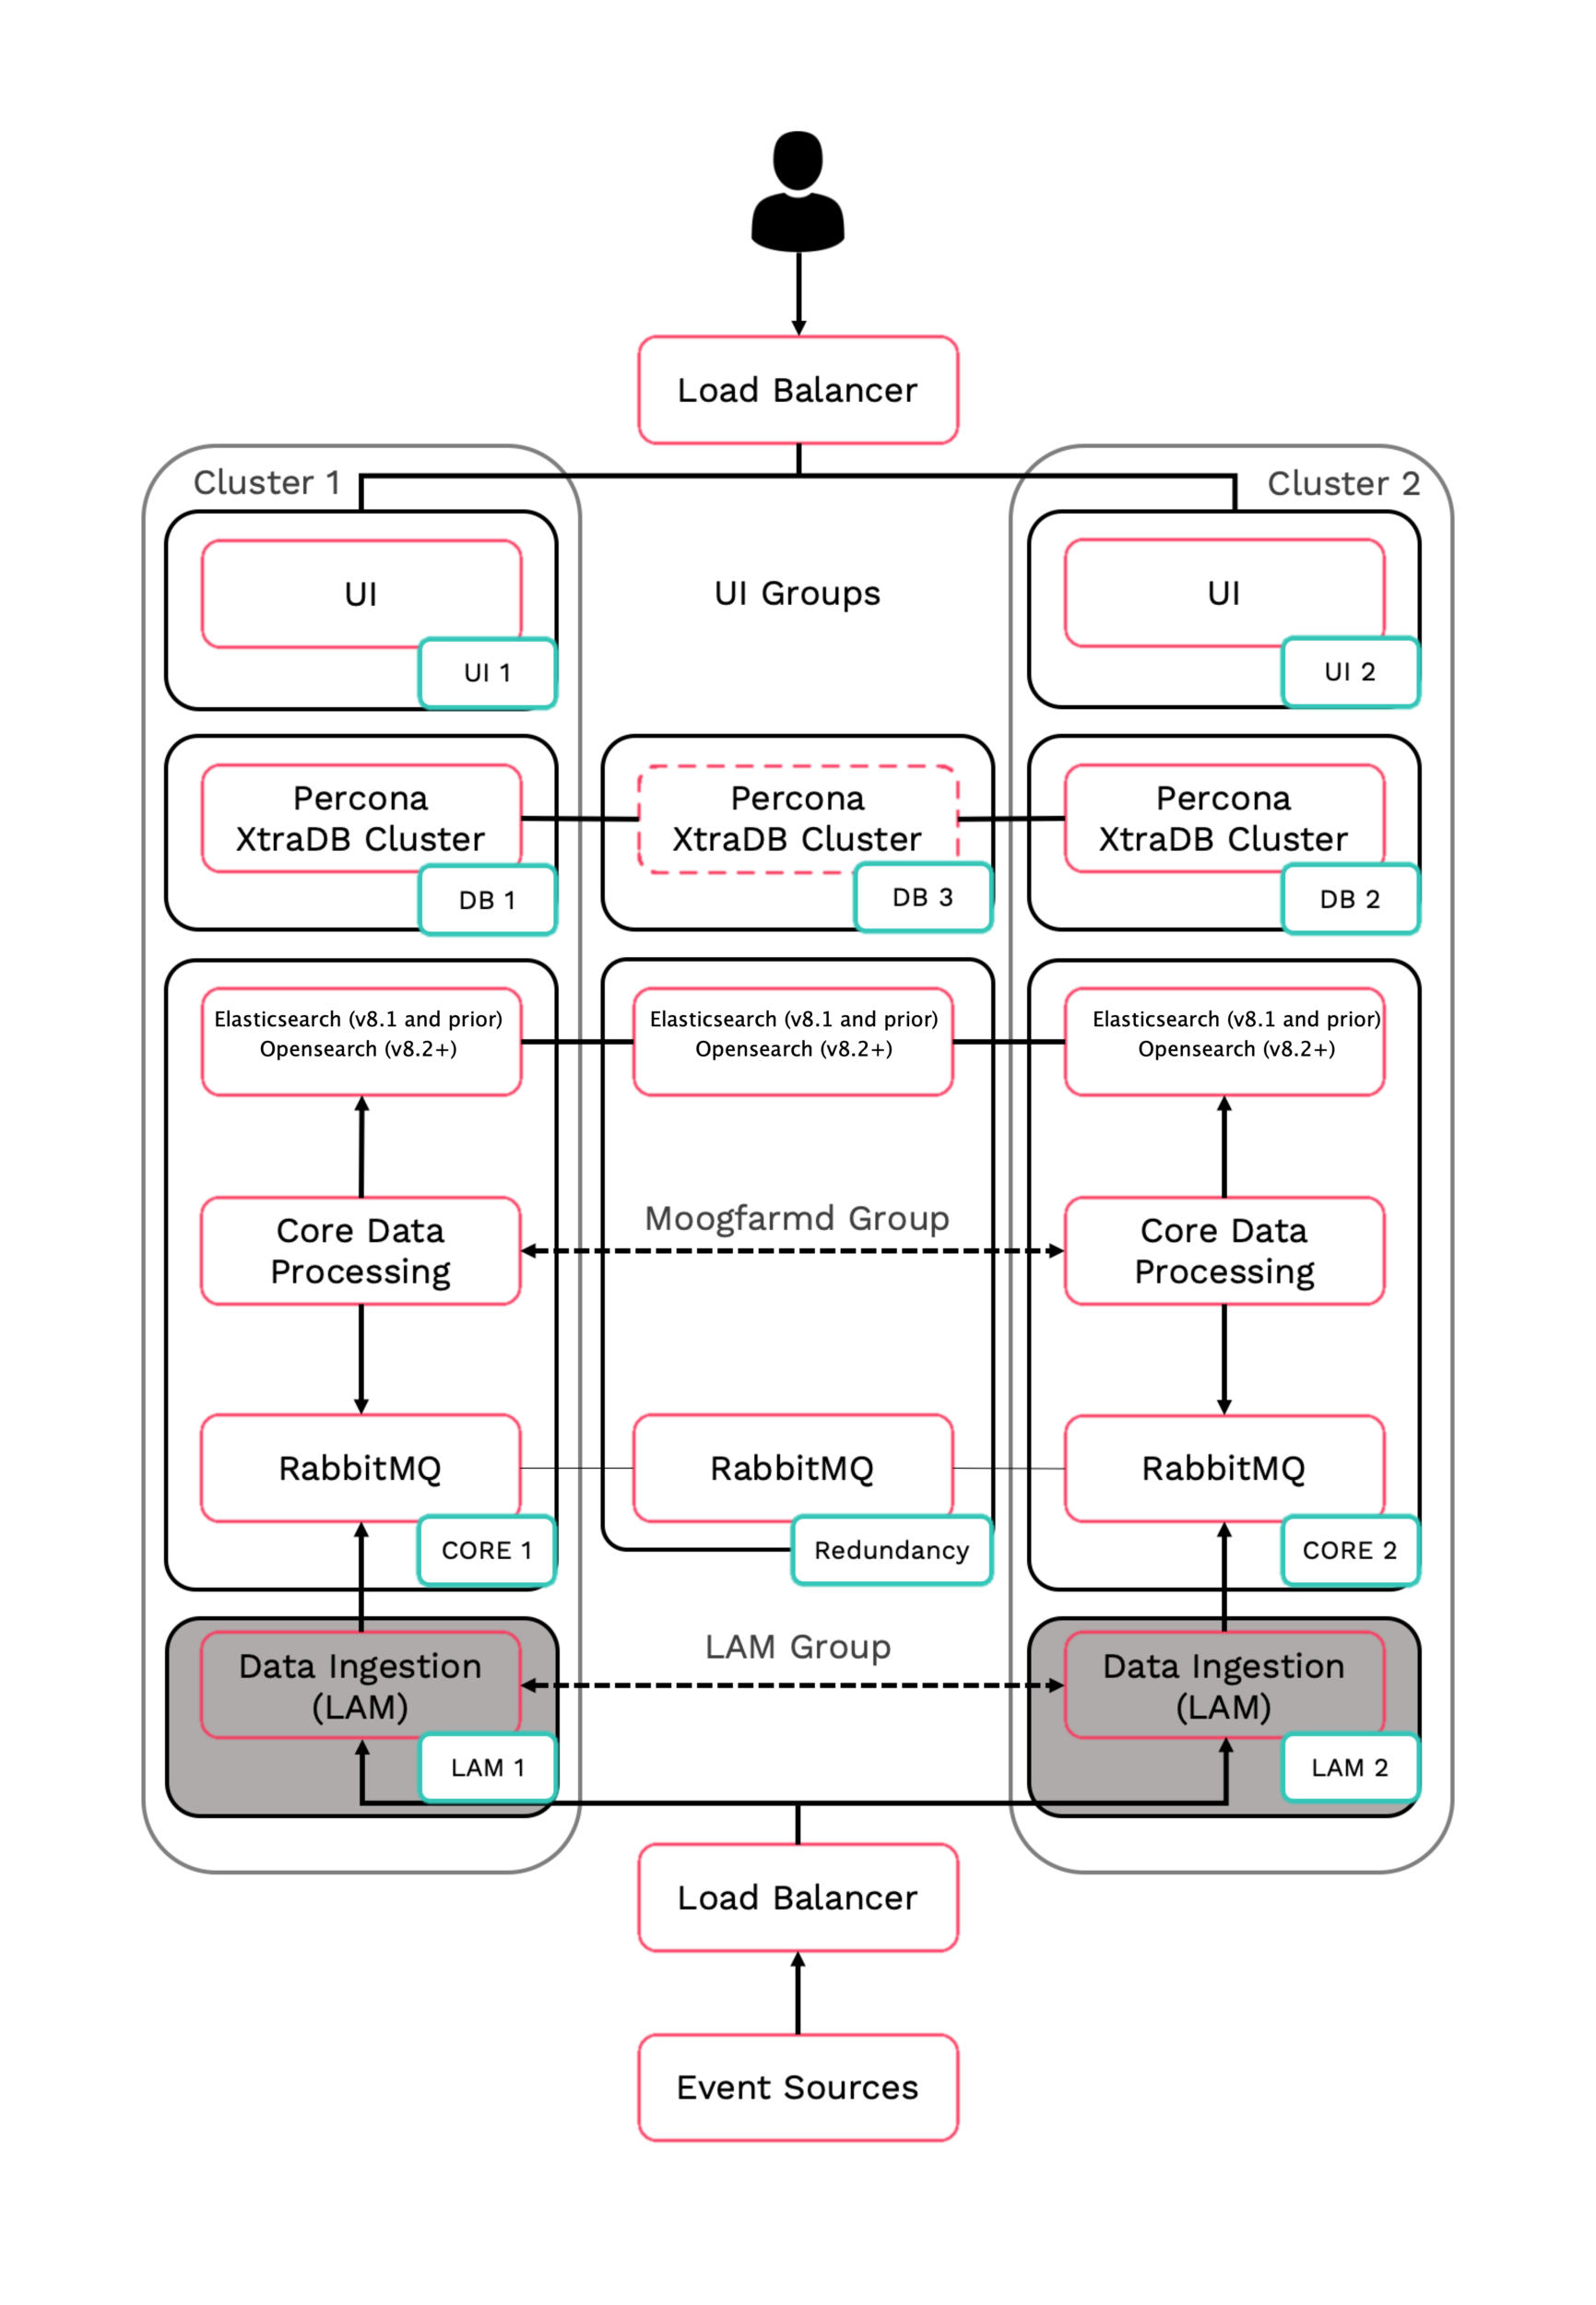
In HA architecture, LAM 1 and LAM 2 run in an active / passive mode for a HA polling pair, and in active / active mode for a HA receiving pair.
HA architecture
In our distributed HA installation, the LAM components are installed on the LAM 1 and LAM 2 servers:
Refer to the Distributed HA system Firewall for more information on connectivity within a fully distributed HA architecture.
Install LAM 1
Follow these instructions to install Moogsoft Enterprise on the LAM 1 server.
On LAM 1 install the following Moogsoft Enterprise components:
VERSION=8.2.0; yum -y install moogsoft-common-${VERSION} \
  moogsoft-mooms-${VERSION} \
  moogsoft-integrations-${VERSION} \
  moogsoft-utils-${VERSION}
Edit your
~/.bashrcfile to contain the following lines:export MOOGSOFT_HOME=/usr/share/moogsoft export APPSERVER_HOME=/usr/share/apache-tomcat export JAVA_HOME=/usr/java/latest export PATH=$PATH:$MOOGSOFT_HOME/bin:$MOOGSOFT_HOME/bin/utils
Source the
~/.bashrcfile:source ~/.bashrc
Initialize the local Moogsoft Enterprise RabbitMQ cluster node on the LAM 1 server. Substitute a value into
<zone>that is different from the value chosen for the main RabbitMQ cluster.moog_init_mooms.sh -pz <zone>
On LAM 1, edit
$MOOGSOFT_HOME/config/system.confand set the following properties. Substitute the name of your RabbitMQ zone and the LAM 1 server hostname. Set automatic failover totrueand the cluster name toPRIMARY:"mooms" : { ... "zone" : "<zone>", "brokers" : [ {"host" : "<LAM 1 server hostname>", "port" : 5672}, ], ... "failover" : ... "automatic_failover" : true, } ... "ha": { "cluster": "PRIMARY" }
Install LAM 2
Follow these instructions to install Moogsoft Enterprise on the LAM 2 server.
On LAM 2 install the following Moogsoft Enterprise components:
VERSION=8.2.0; yum -y install moogsoft-common-${VERSION} \
  moogsoft-mooms-${VERSION} \
  moogsoft-integrations-${VERSION} \
  moogsoft-utils-${VERSION}
Edit your
~/.bashrcfile to contain the following lines:export MOOGSOFT_HOME=/usr/share/moogsoft export APPSERVER_HOME=/usr/share/apache-tomcat export JAVA_HOME=/usr/java/latest export PATH=$PATH:$MOOGSOFT_HOME/bin:$MOOGSOFT_HOME/bin/utils
Source the
~/.bashrcfile:source ~/.bashrc
Initialize the local Moogsoft Enterprise RabbitMQ cluster node on the LAM 2 server. Use the same zone that you specified for LAM 1.
moog_init_mooms.sh -pz <zone>
On LAM 2, edit
$MOOGSOFT_HOME/config/system.confand set the following properties. Substitute the name of your RabbitMQ zone and the LAM 2 server hostname. Set automatic failover totrueand the cluster name toSECONDARY:"mooms" : { ... "zone" : "<zone>", "brokers" : [ {"host" : "<LAM 2 server hostname>", "port" : 5672}, ], ... "failover" : ... "automatic_failover" : true, } ... "ha": { "cluster": "SECONDARY" }
Enable event delivery
You must set up either Moogsoft Bridge or WebSockets LAMs to enable event delivery:
See Moogsoft Bridge for information on how to enable Moogsoft Bridge.
See WebSockets LAM for information on how to enable WebSockets LAM.
Configure a new backend LAM integration as HA on LAM 1 and LAM 2
Follow the instructions in Set Up LAMs for HA.