Basic HA Installation - RPM
This topic describes the basic High Availability (HA) installation for Moogsoft Enterprise using RPM. This installation configuration has three servers; two for the primary and secondary clusters, and a redundancy server. A three-server installation is good for user acceptance testing (UAT) or pre-production. For production installations Moogsoft recommends five, seven, or nine servers.
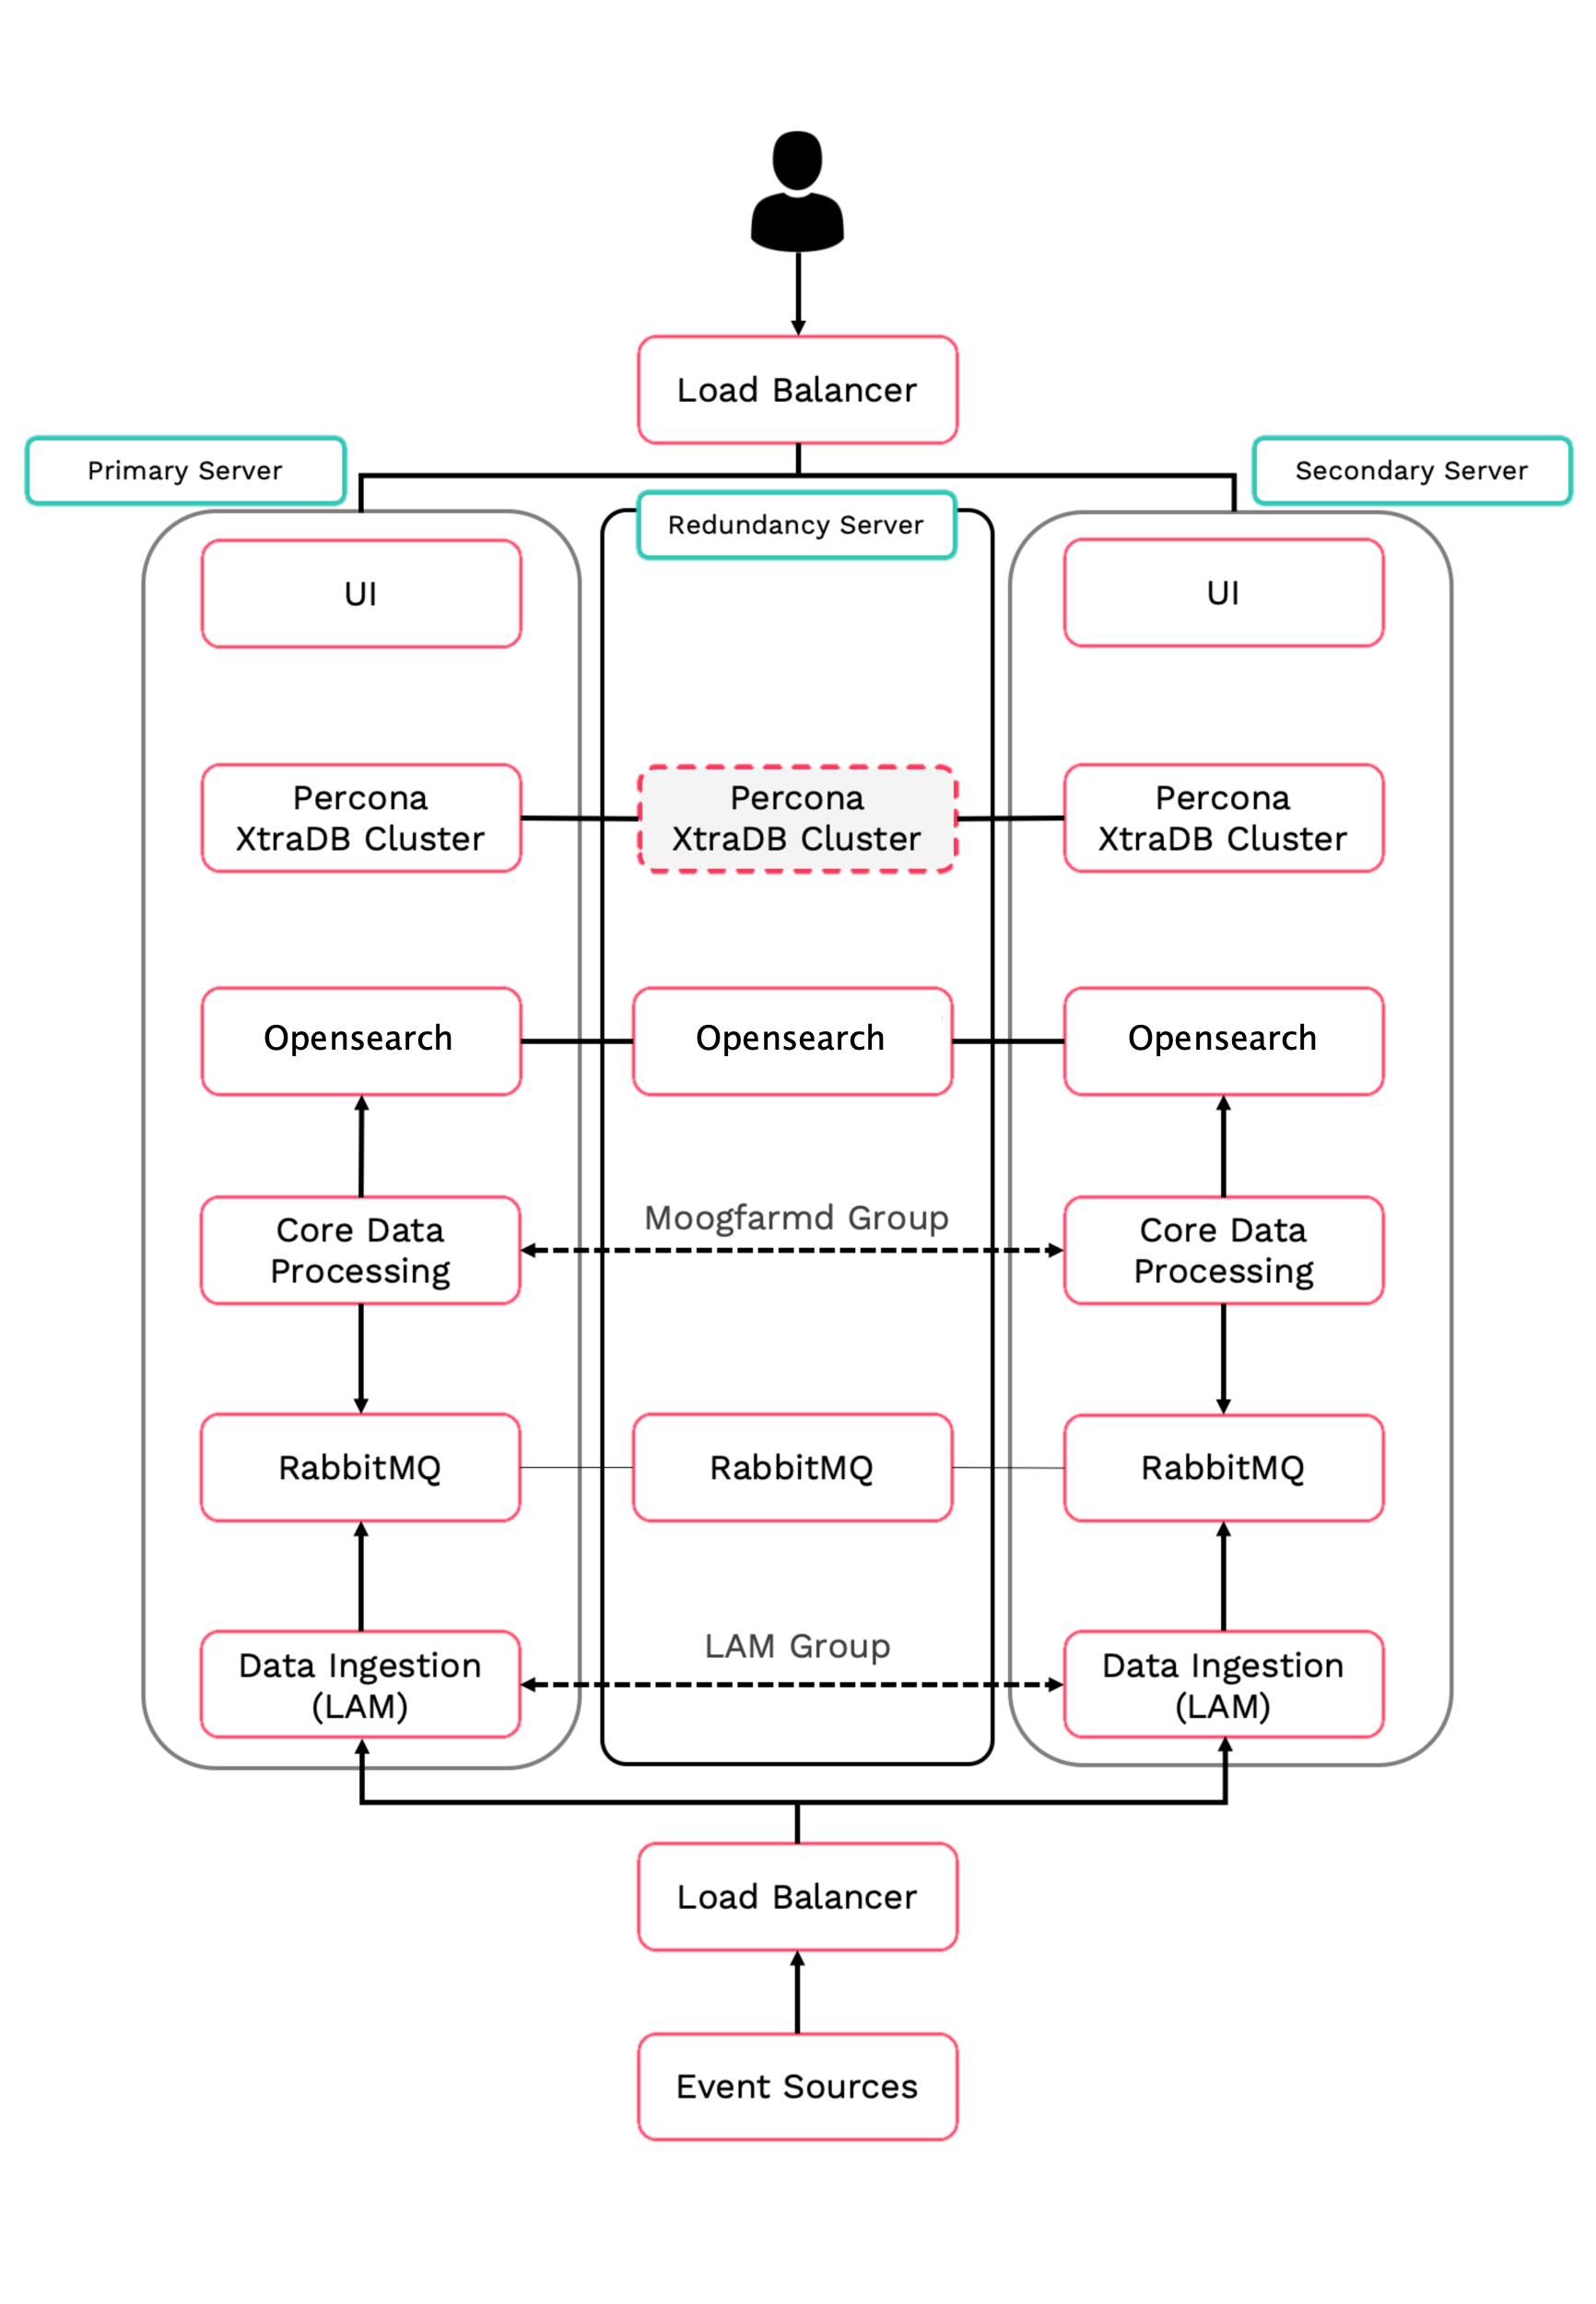
This topic describes how to perform the following tasks for the core Moogsoft Enterprise components:
Install the Moogsoft Enterprise packages and set the environment variables.
Set up the Percona XtraDB database and HA Proxy.
Configure the RabbitMQ message broker and Elasticsearch/Opensearch service.
Configure high availability for the Moogsoft Enterprise core processing components.
Initialize the user interface (UI).
Configure high availability for data ingestion.
Before you begin
Before you start to configure your highly available deployment of Moogsoft Enterprise:
Familiarize yourself with the single-server deployment process: Install Moogsoft Enterprise and Upgrade Moogsoft Enterprise.
Read the High Availability Overview and review the HA Reference Architecture.
Verify that the hosts can access the required ports on the other hosts in the group. See HA Reference Architecture for more information.
Verify that you have root access to all three servers. You must perform this installation as the root user.
Complete either the Online RPM pre-installation or Moogsoft Enterprise - Offline RPM pre-installation instructions.
Prepare to install Moogsoft Enterprise
Before you install the Moogsoft Enterprise packages, perform the pre-installation tasks on all three servers.
Install Moogsoft Enterprise packages
Install the Moogsoft Enterprise packages on all three servers. Make sure you install the version you want by changing the VERSION number (8.2.0 in the following example):
Primary, Secondary and Redundancy servers:
VERSION=8.2.0; yum -y install moogsoft-server-${VERSION} \
moogsoft-db-${VERSION} \
moogsoft-utils-${VERSION} \
moogsoft-search-${VERSION} \
moogsoft-ui-${VERSION} \
moogsoft-common-${VERSION} \
moogsoft-mooms-${VERSION} \
moogsoft-integrations-${VERSION} \
moogsoft-integrations-ui-${VERSION}
Edit the ~/.bashrc file to contain the following lines:
export MOOGSOFT_HOME=/usr/share/moogsoft
export APPSERVER_HOME=/usr/share/apache-tomcat
export JAVA_HOME=/usr/java/latest
export PATH=$PATH:$MOOGSOFT_HOME/bin:$MOOGSOFT_HOME/bin/utils
Source the .bashrc file:
source ~/.bashrc
Initialize the database
Install the Percona nodes and initialize the database on the primary server. Substitute the IP addresses of your servers and choose the password for the sstuser. Press <Enter> at the password prompt during initialization.
Primary server:
bash install_percona_nodes.sh -p -i <PRIMARY_IP>,<SECONDARY_IP>,<REDUNDANCY_IP> -u sstuser -w <SSTPASSWORD>

moog_init_db.sh -qIu root
Install the Percona nodes on the secondary and redundancy servers. Substitute the IP addresses of your servers and use the same sstuser password as the primary server. Do not initialize the database on these servers.
Secondary and Redundancy servers:
bash install_percona_nodes.sh -i <PRIMARY_IP>,<SECONDARY_IP>,<REDUNDANCY_IP> -u sstuser -w <SSTPASSWORD>
To verify that the Percona initialization was successful, run the following command on all three servers. Substitute the IP address of your primary server:
curl http://<PRIMARY_IP>:9198
If successful, you see the following message:
Percona XtraDB Cluster Node is synced
Set up HA Proxy
Install HA Proxy on the primary and secondary servers. Substitute the IP addresses of your servers.
Primary and Secondary servers:
$MOOGSOFT_HOME/bin/utils/haproxy_installer.sh -l 3309 -c -i <PRIMARY_IP>:3306,<SECONDARY_IP>:3306,<REDUNDANCY_IP>:3306
Run the following script to confirm successful installation:
$MOOGSOFT_HOME/bin/utils/check_haproxy_connections.sh
If successful, you see a script output similar to the following example:
HAProxy Connection Counts
Frontend:
    0.0.0.0:3309 : 27
Backend:
    mysql_node_1 172.31.82.211:3306 : 27
    mysql_node_2 172.31.82.133:3306 : 0
    mysql_node_3 172.31.85.42:3306 : 0
Set up RabbitMQ
Initialize and configure RabbitMQ on all three servers.
Primary, Secondary and Redundancy servers:
Substitute a name for your zone.
moog_init_mooms.sh -pz <MY_ZONE>
The primary erlang cookie is located at /var/lib/rabbitmq/.erlang.cookie. The erlang cookie must be the same for all RabbitMQ nodes. Replace the erlang cookie on the secondary and redundancy servers with the erlang cookie from the primary server. Make the cookies on the secondary and redundancy servers read-only:
chmod 400 /var/lib/rabbitmq/.erlang.cookie
You may need to change the file permissions on the secondary and redundancy erlang cookies first to allow those files to be overwritten. For example:
chmod 406 /var/lib/rabbitmq/.erlang.cookie
Restart RabbitMQ on the secondary and redundancy servers and join the cluster. Substitute the short hostname of your primary server and the name of your zone.
The short hostname is the full hostname excluding the DNS domain name. For example, if the hostname is ip-172-31-82-78.ec2.internal, the short hostname is ip-172-31-82-78. To find out the short hostname, run rabbitmqctl cluster_status on the primary server.
Secondary and Redundancy servers:
systemctl restart rabbitmq-server
rabbitmqctl stop_app
rabbitmqctl join_cluster rabbit@<PRIMARY_SHORT_HOSTNAME>
rabbitmqctl start_app
rabbitmqctl set_policy -p <MY_ZONE> ha-all ".+\.HA" '{"ha-mode":"all"}'
Run rabbitmqctl cluster_status to get the cluster status. Example output is as follows:
Cluster status of node rabbit@ip-172-31-93-201 ...
[{nodes,[{disc,['rabbit@ip-172-31-82-211','rabbit@ip-172-31-85-42','rabbit@ip-172-31-93-201']}]},
{running_nodes,['rabbit@ip-172-31-85-42','rabbit@ip-172-31-82-211','rabbit@ip-172-31-93-201']},
{cluster_name,<<"rabbit@ip-172-31-93-201.ec2.internal">>},
{partitions,[]},
{alarms,[{'rabbit@ip-172-31-85-42',[]},{'rabbit@ip-172-31-82-211',[]},{'rabbit@ip-172-31-93-201',[]}]}]
Set up Elasticsearch/Opensearch
Initialize and configure Search on all three servers.
For Moogsoft Enterprise v8.1.x and older:
Primary, Secondary and Redundancy servers
moog_init_search.sh
Uncomment and edit the properties in the Elasticsearch YAML file
/etc/elasticsearch/elasticsearch.ymlon all three servers as follows:cluster.name: aiops node.name: <SERVER_HOSTNAME> ... network.host: 0.0.0.0 http.port: 9200 discovery.zen.ping.unicast.hosts: ["<PRIMARY_HOSTNAME>","<SECONDARY_HOSTNAME>","<REDUNDANCY_HOSTNAME>"] discovery.zen.minimum_master_nodes: 1 gateway.recover_after_nodes: 1 node.master: true
Restart Elasticsearch on all three servers:
service elasticsearch restart
For Moogsoft Enterprise v8.2.x and newer:
Primary, Secondary and Redundancy servers
moog_init_search.sh -i
Edit the following properties in /etc/opensearch/opensearch.yml, changing the node names etc as appropriate:
cluster.name: moog-opensearch-cluster
node.name: node1
network.host: 0.0.0.0
node.master: true
discovery.seed_hosts: ["node1.example.com",
                      "node2.example.com",
                      "node3.example.com"]
cluster.initial_master_nodes: ["node1","node2","node3"]
plugins.security.allow_default_init_securityindex: true
plugins.security.ssl.transport.pemcert_filepath: /etc/opensearch/node1.pem
plugins.security.ssl.transport.pemkey_filepath: /etc/opensearch/node1-key.pem
plugins.security.ssl.transport.pemtrustedcas_filepath: /etc/opensearch/root-ca.pem
plugins.security.ssl.transport.enforce_hostname_verification: false
plugins.security.restapi.roles_enabled: ["all_access"]
plugins.security.ssl.http.enabled: false
plugins.security.authcz.admin_dn:
  - 'CN=ADMIN,OU=UNIT,O=ORG,L=TORONTO,ST=ONTARIO,C=CA'
# Give value according to SSL certificate.
plugins.security.nodes_dn:
    - 'CN=node1.example.com,OU=UNIT,O=ORG,L=TORONTO,ST=ONTARIO,C=CA'
    - 'CN=node2.example.com,OU=UNIT,O=ORG,L=TORONTO,ST=ONTARIO,C=CA'
    - 'CN=node2.example.com,OU=UNIT,O=ORG,L=TORONTO,ST=ONTARIO,C=CA'
Restart Opensearch on all three servers:
service opensearch restart
Initialise the security plugin on node1/Primary server:
/usr/share/opensearch/plugins/opensearch-security/tools/securityadmin.sh -cd /usr/share/opensearch/plugins/opensearch-security/securityconfig/ -nhnv \
  -cacert /etc/opensearch/root-ca.pem \
  -cert /etc/opensearch/admin.pem \
  -key /etc/opensearch/admin-key.pem \
  -cn moog-opensearch-cluster
Get the health status of the cluster.
Primary server:
curl -X GET "localhost:9200/_cat/health?v&pretty"
Example cluster health status:
epoch timestamp cluster status
node.total node.data shards pri relo init
unassign pending_tasks
max_task_wait_time
active_shards_percent
1580490422 17:07:02 aiops green 3 3 0 0 0 0 0 0 - 100.0%
The minimum and maximum JVM heap sizes must be large enough to ensure that Elasticsearch starts.
See Finalize and Validate the Install for more information.
Opensearch/Elasticsearch Encryption
You can enable password authentication on Opensearch/Elasticsearch by editing the $MOOGSOFT_HOME/config/system.conf configuration file. You can use either an unencrypted password or an encrypted password, but you cannot use both.
You should use an encrypted password in the configuration file if you do not want users with configuration access to be able to access integrated systems.
Enable password authentication
To enable unencrypted password authentication on Opensearch/Elasticsearch, set the following properties in the system.conf file:
"search":
    {
    ...
    “username” : <username>,
    “password” : <password>,
    ...
    }
To enable encrypted password authentication on Opensearch/Elasticsearch, set the following properties in the system.conf file:
"search":
    {
    ...
    “username” : <username>,
    “encrypted_password” : <encrypted password>
    ...
    }
Initialize Opensearch/Elasticsearch
Opensearch in v8.2.x already has password authentication enabled, but other users can be added. If the admin password was already changed by moog_init_search.sh while deploying Opensearch, the script will prompt for admin account details to use to create the new users. To initialize Opensearch/Elasticsearch with password authentication, run:
moog_init_search.sh -a username:password
or:
moog_init_search.sh --auth username:password
If you run moog_init_search without the -a/--auth parameters, you will not enable password authentication in Opensearch/Elasticsearch.
See Moog Encryptor for more information on how to encrypt passwords stored in the system.conf file.
You can also manually add authentication to the Opensearch/Elasticsearch configuration. You should do this if you have your own local Opensearch/Elasticsearch installation. See the external documentation for Opensearch here https://opensearch.org/docs/latest/security-plugin/configuration/index/ or Elasticsearch here: Elasticsearch documentation on configuring security for more information.
Configure Moogsoft Enterprise
Configure Moogsoft Enterprise by editing the Moogfarmd and system configuration files.
Primary and Secondary servers:
Edit $MOOGSOFT_HOME/config/system.conf and set the following properties. Substitute the name of your RabbitMQ zone, the server hostnames, and the cluster names.
"mooms" :
   {
...
"zone" : "<MY_ZONE>",

"brokers" : [
    {"host" : "<PRIMARY_HOSTNAME>", "port" : 5672},
    {"host" : "<SECONDARY_HOSTNAME>", "port" : 5672},
    {"host" : "<REDUNDANCY_HOSTNAME>", "port" : 5672}
],
...
"cache_on_failure" : true,
...
"search" :
    {
...
    "nodes" : [
        {"host" : "<PRIMARY_HOSTNAME>", "port" : 9200},
        {"host" : "<SECONDARY_HOSTNAME>", "port" : 9200},
        {"host" : "<REDUNDANCY_HOSTNAME>", "port" : 9200}
    ]
...
"failover" :
    {
    "persist_state" : true,
    "hazelcast" :
        {
        "hosts" : ["<PRIMARY_HOSTNAME>","<SECONDARY_HOSTNAME>"],
        "cluster_per_group" : true
        }
    "automatic_failover" : true,
    }
...
"ha":
    { "cluster": "<CLUSTER_NAME, PRIMARY or SECONDARY>" }
Uncomment and edit the following properties in $MOOGSOFT_HOME/config/moog_farmd.conf. Note the importance of the initial comma. Delete the cluster line in this section of the file.
Primary server
,
ha:
{
    group: "moog_farmd",
    instance: "moog_farmd",
    default_leader: true,
    start_as_passive: false
}
Secondary server
,
ha:
{
    group: "moog_farmd",
    instance: "moog_farmd",
    default_leader: false,
    start_as_passive: false
}
Start Moogfarmd on the primary and secondary servers:
systemctl start moogfarmd
After starting Moogfarmd on the primary and secondary servers, run the HA Control command line utility ha_cntl -v to check the status of Moogfarmd. Example output is as follows:
Moogsoft AIOps Version 8.2.0
(C) Copyright 2012-2020 Moogsoft, Inc.
All rights reserved.
Executing: ha_cntl
Getting system status
Cluster: [PRIMARY] active
	Process Group: [moog_farmd] Active (only leader should be active)
		Instance: [primary] Active Leader
			Component: Alert Workflows - running
			Component: AlertBuilder - running
			Component: AlertMgr - not running
			Component: AlertRulesEngine - not running
			Component: Default Cookbook - running
			Component: Enricher - not running
			Component: Enrichment Workflows - running
			Component: Event Workflows - running
			Component: Feedback - not running
			Component: Housekeeper - running
			Component: Indexer - running
			Component: MaintenanceWindowManager - running
			Component: Notifier - not running
			Component: Scheduler - not running
			Component: Situation Workflows - running
			Component: SituationMgr - running
			Component: SituationRootCause - running
			Component: TeamsMgr - running
Cluster: [SECONDARY] partially active
	Process Group: [moog_farmd] Passive (only leader should be active)
		Instance: [secondary] Passive Leader
			Component: Alert Workflows - not running (will run on activation)
			Component: AlertBuilder - not running (will run on activation)
			Component: AlertMgr - not running
			Component: AlertRulesEngine - not running
			Component: Enricher - not running
			Component: Enrichment Workflows - not running (will run on activation)
			Component: Event Workflows - not running (will run on activation)
			Component: Feedback - not running
			Component: Housekeeper - not running (will run on activation)
			Component: Indexer - not running (will run on activation)
			Component: MaintenanceWindowManager - not running (will run on activation)
			Component: Notifier - not running
			Component: Scheduler - not running
			Component: Situation Workflows - not running (will run on activation)
			Component: SituationMgr - not running (will run on activation)
			Component: SituationRootCause - not running (will run on activation)
			Component: TeamsMgr - not running (will run on activation)
For more information, see the HA Control Utility Command Reference.
Initialize the User Interface
Run the initialization script moog_init_ui.sh on the primary server. Substitute the name of your RabbitMQ zone and primary hostname.
When asked if you want to change the configuration hostname, say yes and enter the public URL for the server.
Primary server:
moog_init_ui.sh -twfz <MY_ZONE> -c <PRIMARY_HOSTNAME>:15672 -m <PRIMARY_HOSTNAME>:5672 -s <PRIMARY_HOSTNAME>:9200 -d <PRIMARY_HOSTNAME>:3309 -n
Edit the servlets settings on the primary server in the file $MOOGSOFT_HOME/config/servlets.conf. Note the importance of the initial comma.
,ha :
{
    cluster: "primary",
    instance: "servlets",
    group: "servlets_primary",
    start_as_passive: false
}
Start Apache Tomcat on the primary server:
systemctl start apache-tomcat
Restart Moogfarmd:
systemctl restart moogfarmd
Run the initialization script moog_init_ui.sh on the secondary server. Substitute the name of your RabbitMQ zone.
When asked if you want to change the configuration hostname, say yes and enter the public URL for the server.
Secondary server:
moog_init_ui.sh -twfz MY_ZONE -c <SECONDARY_HOSTNAME>:15672 -m <SECONDARY_HOSTNAME>:5672 -s <SECONDARY_HOSTNAME>:9200 -d <SECONDARY_HOSTNAME>:3309 -n
Edit the servlets settings in the secondary server $MOOGSOFT_HOME/config/servlets.conf file. Note the importance of the initial comma.
,ha :
{
    cluster: "secondary",
    instance: "servlets",
    group: "servlets_secondary",
    start_as_passive: false
}
Start Apache Tomcat on the secondary server:
systemctl start apache-tomcat
Restart Moogfarmd:
systemctl restart moogfarmd
Run the HA Control command line utility ha_cntl -v to check the status of the UI:
Moogsoft AIOps Version 8.2.0
(C) Copyright 2012-2020 Moogsoft, Inc.
All rights reserved.
Executing: ha_cntl
Getting system status
Cluster: [PRIMARY] active
        ...
	Process Group: [servlets_primary] Active (no leader - all can be active)
		Instance: [servlets] Active
			Component: moogpoller - running
			Component: moogsvr - running
			Component: situation_similarity - running
			Component: toolrunner - running
Cluster: [SECONDARY] partially active
        ...
	Process Group: [servlets_secondary] Active (no leader - all can be active)
		Instance: [servlets] Active
			Component: moogpoller - running
			Component: moogsvr - running
			Component: situation_similarity - running
			Component: toolrunner - running
For more information, see the HA Control Utility Command Reference.
Enable HA for LAMs
There are two types of HA configuration for LAMs; Active/Active and Active/Passive:
Receiving LAMs that listen for events are configured as Active/Active. For example, the REST LAM.
Polling LAMs are configured as Active/Passive. For example, the SolarWinds LAM.
Every LAM has its own configuration file under $MOOGSOFT_HOME/config/. This example references rest_lam.conf and solarwinds_lam.conf.
Primary and Secondary servers
Edit the HA properties in the primary and secondary servers' LAM configuration files. Moogsoft Enterprise automatically manages the active and passive role for the LAMs in a single process group:
# Receiving LAM (Active / Active)
# Configuration on Primary
ha:
{
    group            : "rest_lam_primary",
    instance         : "rest_lam",
    duplicate_source : false
},
...
# Configuration on Secondary
ha:
{
    group            : "rest_lam_secondary",
    instance         : "rest_lam",
    duplicate_source : false
},
# Polling LAM (Active / Passive)
# Configuration on Primary
ha:
{
    group                    : "solarwinds_lam",
    instance                 : "solarwinds_lam",
    only_leader_active       : true,
    default_leader           : true,
    accept_conn_when_passive : false,
    duplicate_source         : false
},
...
# Configuration on Secondary
ha:
{
    group                    : "solarwinds_lam",
    instance                 : "solarwinds_lam",
    only_leader_active       : true,
    default_leader           : false,
    accept_conn_when_passive : false,
    duplicate_source         : false
},
Start the LAMs:
systemctl start restlamd
systemctl start solarwindslamd
Run the HA Control command line utility ha_cntl -v to check the status of the LAMS:
Moogsoft AIOps Version 8.2.0
(C) Copyright 2012-2020 Moogsoft, Inc.
All rights reserved.
Executing: ha_cntl
Getting system status
Cluster: [PRIMARY] active
        ...
	Process Group: [rest_lam_primary] Active (no leader - all can be active)
		Instance: [rest_lam] Active
        ...
        Process Group: [solarwinds_lam] Active (only leader should be active)
                Instance: [solarwinds_lam] Active Leader

Cluster: [SECONDARY] partially active
        ...
	Process Group: [rest_lam_secondary] Passive (no leader - all can be active)
		Instance: [rest_lam] Active
        ...
        Process Group: [solarwinds_lam] Passive (only leader should be active)
                Instance: [solarwinds_lam] Passive
For more information, see the HA Control Utility Command Reference.