Use mapping types in custom integrations
Mapping types let you manipulate payload field assignments to Moogsoft Cloud target fields from source payloads your custom integrations receive.
For more information about adding custom integrations using Create your own integration (CYOI), see Define a custom integration.
Mapping information
Mapping data fields lets you connect the data from your source system payloads to target fields in Moogsoft. The fields you choose to map directly affect the accuracy of the alert deduplication process, since the deduplication key defines the information used to perform this process. Mapped fields also display useful information in alerts.
You can map top-level objects to a target field, or objects nested inside other objects.
Using the following payload object, you could map example to a target field or you could map example1, example2, example3 and example4 to target fields:
    "example": {
        "example1":"value1",
        "example2":"value2",
        "example3":"value3",
        "example4":"value4"
    },
To access the menu to assign different mapping types, click the Mapping type selector (arrow button) in the same row as the payload and target fields:

To change to a different mapping type or edit a mapping configuration, click the Edit button in the popup:

After mapping fields or making changes to field mappings, be sure to test your deduplication key and, when the test is successful, click Save and Enable to begin or continue ingesting data using your selected integration mappings.
Special fields
Most target fields can be mapped to any payload fields. There are two special target fields in Moogsoft:
TagsThe
Tagsfield maps to an object in the source calledtagswhich contains informational tags in the form of key-value pairs. Use this field with the Auto Add Tag Fields mapping type.serviceThe
servicefield maps to an array source field. It is designed to work with the List mapping type. You can also map it to a source field with a single value, if preferred.
Default text
The Default text option lets you configure placeholder text to display when the mapped payload field is either missing or equal to null. Note that if the payload field is present but does not contain a value, nothing displays instead of the default text.
Save options
Clicking Save only saves your current mapping configuration but does not enable the integration. You can use this option to save configurations missing required mappings, configurations with numerous empty lines, and other issues until you have the information to finish setting it up.
If you attempt to edit an existing integration that was previously enabled, clicking Save only does not replace the mappings that are currently in use. Instead, the mappings present when you enabled the integration remain in use. Save only saves a draft version. The next time you edit the integration mappings, the draft version displays, not the mappings currently in use.
Clicking Save and enable saves the currently displayed mappings and applies them to the integration. This option also validates your mappings in addition to saving them. If you have mappings that are not valid for any reason, those rows are flagged and text displays on the screen, prompting you to fix the issues.
After you map your payload fields, you can click Save Only to save a draft of your work, or click Save and Enable to begin using the integration to ingest data.
When you begin editing a mapping configuration for an integration that is currently in use, the Revert Draft option appears under the list of mappings. Clicking Revert Draft undoes any changes you've made since the integration was enabled.
Tip
If you edit the mappings for an enabled integration and make a mistake, click Revert Draft to go back to the original mappings. Revert Draft overrides any saved drafts. This option is useful if someone accidentally saves (but does not enable) the wrong mappings in an integration.
The Basic Mapping type lets you map one or more payload fields to a target field in Moogsoft.
When multiple fields are mapped, Moogsoft checks each payload field mapped to the target, in the order provided, until it finds an existing field containing a non-null value. When it finds a field with a non-null value, it maps it to the target field.
In this example, the payload fields source, altsource, and altsource2 are mapped to the target Source field.

When Moogsoft receives a payload for this integration, it checks each of these mapped fields, in the order they are mapped, until it finds a non-null value. When it find a value, it stops looking and maps the non-null value to the target field. In this example, if source were missing in the payload, Moogsoft would next check for altsource, and then for altsource2. If none of the fields were present, the default text "Missing source" would display instead.
This functionality is useful if your external system produces payloads with different structures. The field named source may not always be the correct field to reference for the source system, for example. If this is true of your external system, send in payloads representing the different variations to Moogsoft and then map the fields in each one to the target field.
The Concatenated type lets you combine the values from multiple payload fields into a single value in the target field. The order of the payload fields determines the order of the values in the final concatenated string. This may or may not be relevant for your purposes.
To concatenate values from the source in the target:
Click inside the Payload field.
Select two or more payload fields.
Arrange the payload fields in the preferred order.
Click the arrow between the two fields and then click Concatenated in the popup.
Click OK.
To also edit the delimiter, click the arrow again and then click the Edit icon in the popup.
Type the character you want to use as the delimiter between the source values.
NOTE: You can choose any character or string of characters.
Click OK to save and close.
Concatenated Example
In this example, we have a payload including the following fields and values:
    "example": {
        "example1":"cloud",
        "example2":"database",
        "example3":"gateway",
        "example4":"router interface"
    },
The + character is configured for the delimiter.
When the fields are mapped like this to Description:

Note that the preview text under the target field shows how the concatenated string will display in an alert based on the currently selected payload with the selected delimiter.
The target Description looks like this when it appears in an alert:
Auto Add Tag Fields lets you map a payload object called tags to the Moogsoft Tag target.
Tags make it possible to sort and filter alerts based on the tag values in the Alerts view.
NOTE: The Auto Add Tag mapping type does not display until you have selected the Tags target field.
To use Auto Add Tag Fields:
Click inside the
Targetfield.Select
Tagsas your target.The mapping type automatically changes to Auto Add Tag Fields and the source changes to
tagswhen you selectTagsas your target field.
Auto Add Tag Fields Example
A payload includes the following tags object:
    "tags": {
        "tag1": "VPC1",
        "tag2": "VPC2",
        "tag3": "VPC3",
        "tag4" :"VPC4"
    },
You can map this payload field to the Moogsoft Tags target field.
Select tags as the payload source and Tags as the target.

The preview text under the target Tags mapping displays the list of tags in the selected array.
An alert for a custom integration with this mapping:

NOTE: If you want to use more than 10 tags, you can create and map as many additional tag fields as you need using the following procedure.
Click Add a mapping.
Click inside the target field and then click Add Tag.
Enter the name for the tag and then click the checkmark.
When you add the tag name, a new Tag:<tagname> target field displays. You can then map the source tag field to this target, repeating the process as many times as necessary.
The List mapping type works with the Service target field, which can accept a multi-value mapping. It lets you map a payload field containing an array (a list of multiple values) to a single target value. If multiple payload fields are mapped, only the first mapped source array reference displays.
To map a payload field containing a list:
Click inside the Payload field.
Select the name of the array you want to use.
Click inside the Target field.
Select
Serviceas your target.
The mapping type automatically changes to List when you make this selection. You cannot change it to another type.
List Example
A single payload field, service, exists in a payload and contains an array of values:
    "service": [
        "db1",
        "db2",
        "web1,"
        "web2"
    ],
The payload service field mapped to the target Service field:

Note that the list of values display in the preview under the target field.
An alert for a custom integration with this mapping:

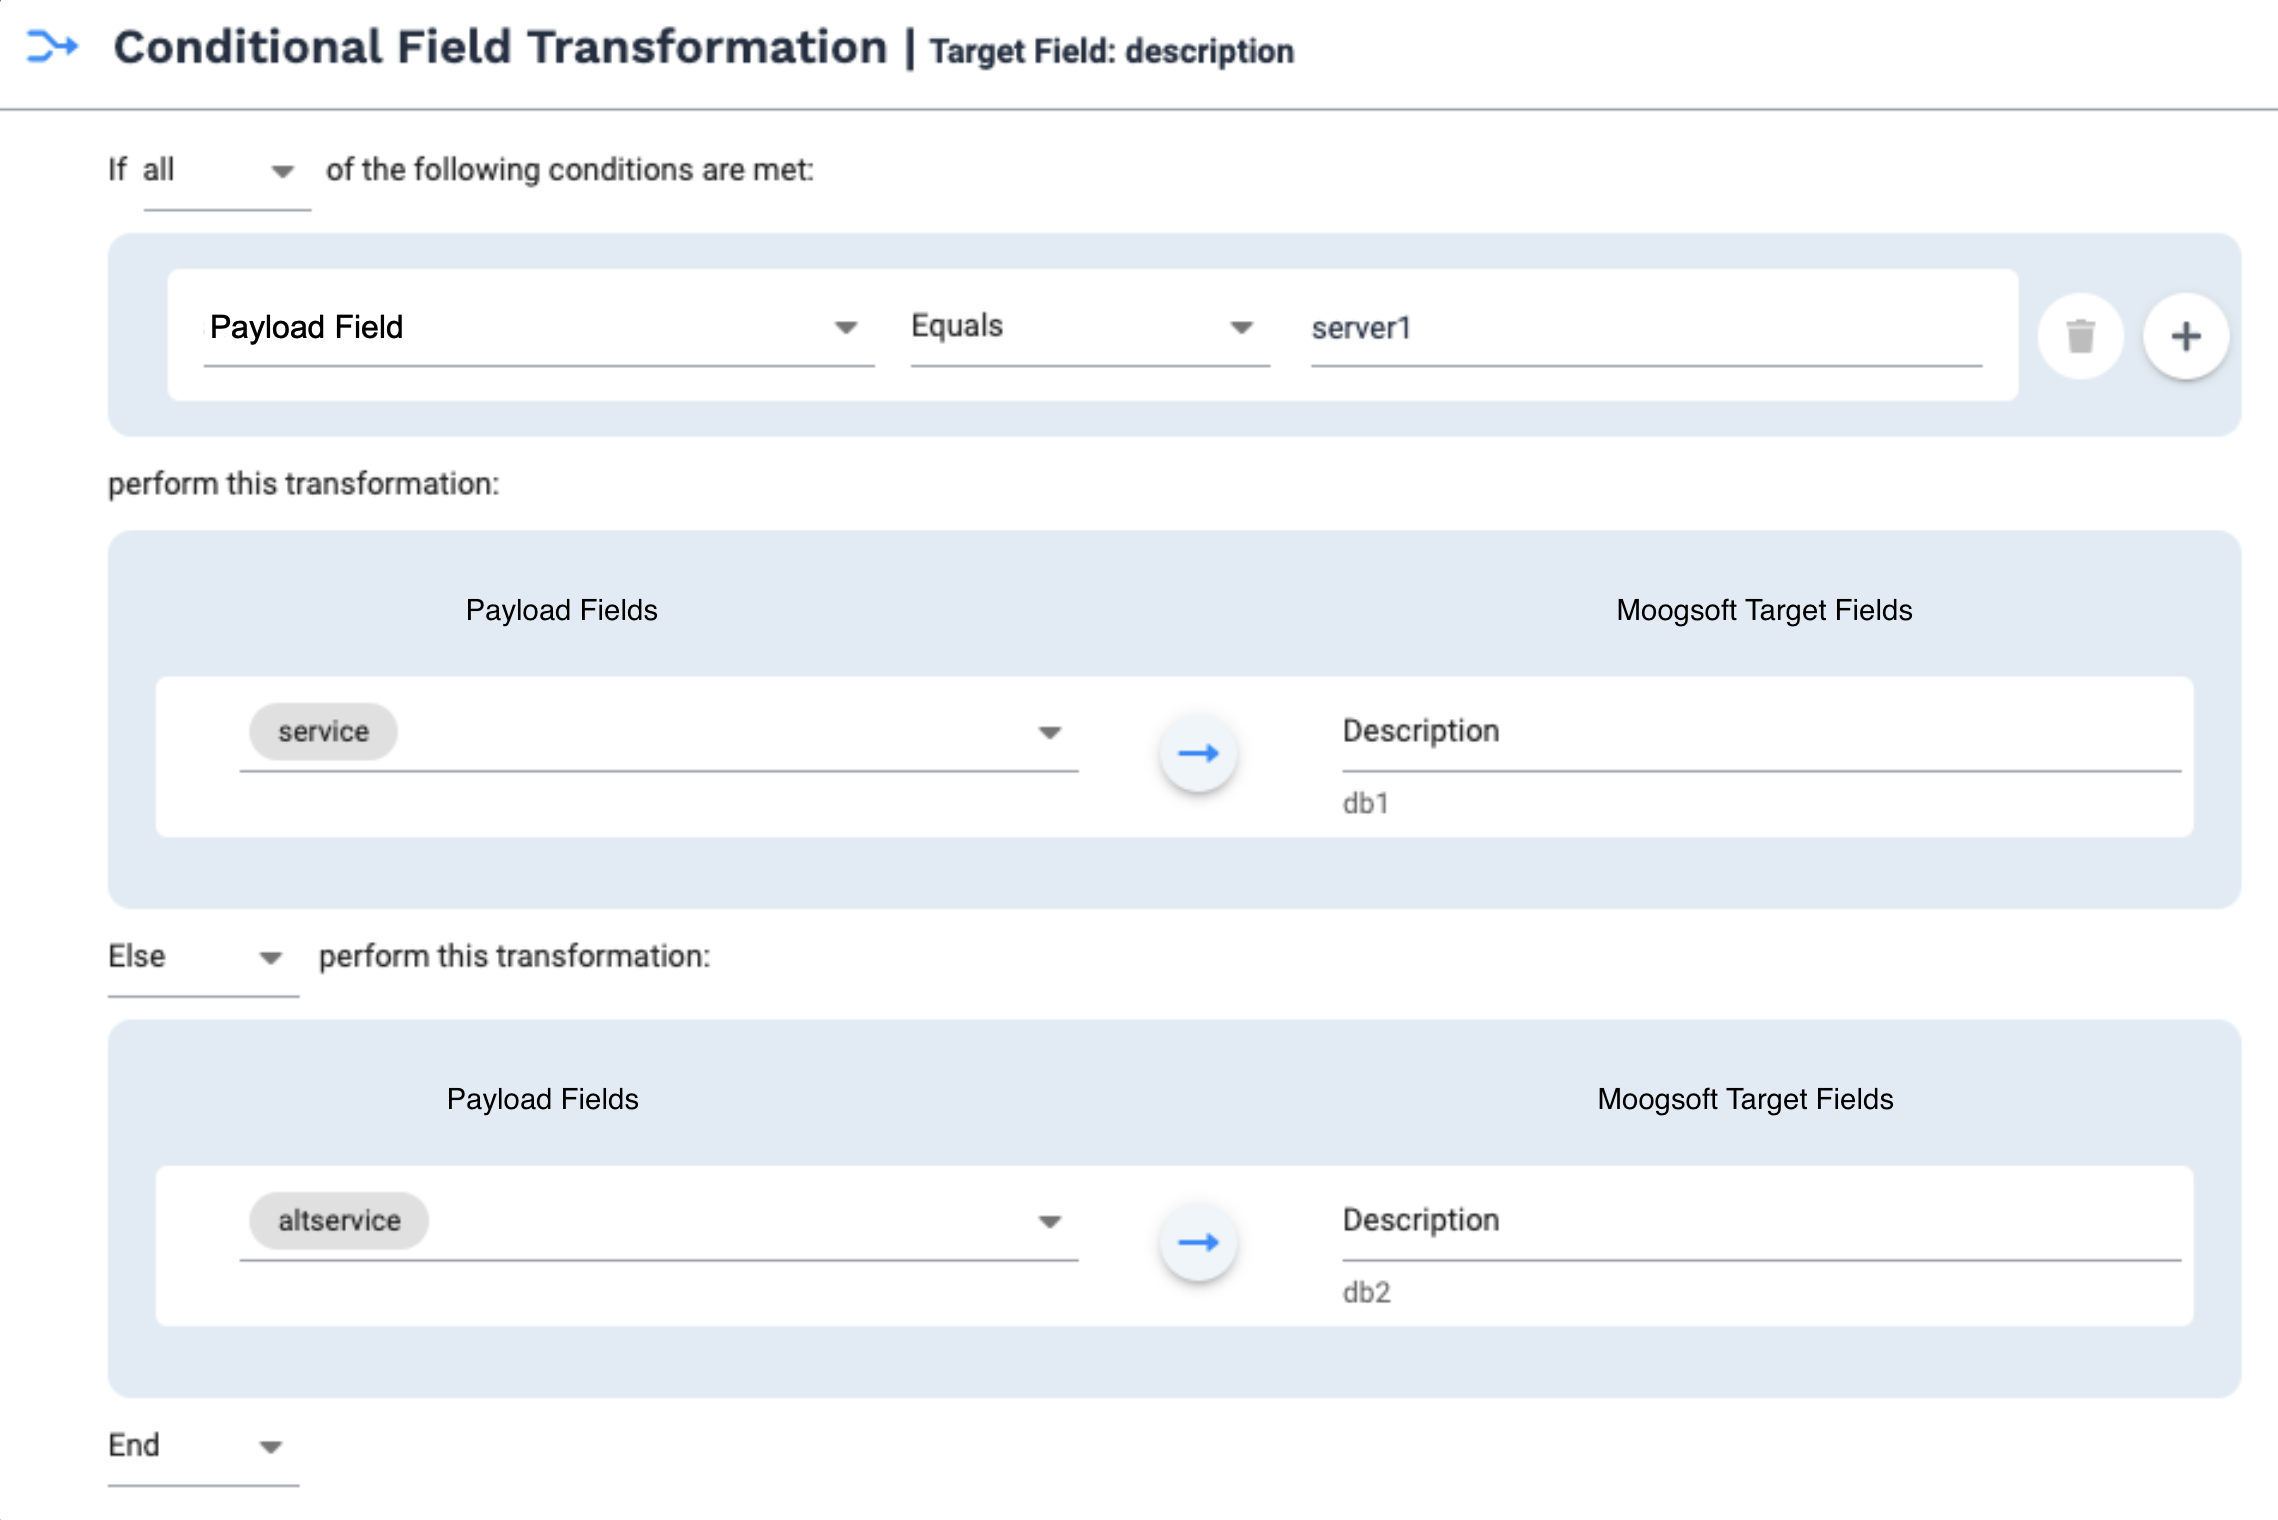
The Conditional mapping type lets you map a value to a target field subject to evaluation of one or more payload fields. You can define what happens to the target when certain conditions evaluate to true, when they evaluate to false, and add further conditions using Else If statements when needed.
To configure a conditional transformation:
Click inside the Target field and select the Moogsoft target field you want to map.
Click the Mapping type selector (arrow button) in the same row as the target field and then click Conditional and then click OK.
Click the Mapping type selector (arrow button) again, select Conditional, and then click the Edit button.
Complete the "If" section:
In the first line, define how you want to evaluate the condition.
Choose one of two operators:
Any: The condition is true if it is true for any of the selected payload fields.
All: The condition is true only if it is true for all of the selected payload fields.
In the next line, select one or more payload fields to evaluate and configure the operators to use.
You can evaluate the value in the selected payload fields using the following operators:
Equals/ Does not equal
Contains/ Does not contain
Begins with/ Does not begin with
Ends with/ Does not end with
Complete the "perform this mapping" section:
Define the mappings to perform when the condition is true.
NOTE: You can select different payload fields to map from, but you can only map to the target you selected when you started the conditional mapping process. If you need to perform multiple conditional mappings based on the same criteria, then you must create a separate conditional mapping for each target.
Select the mapping type you want to use to create the value for the target.
Choose how to proceed after completing the first mapping.
Choose from the following:
End: Stops the mapping process flow.
Else: Defines the steps to perform when the "If" condition is false.
Using Else is optional; if you prefer to map a field only when the condition is true, then select End instead and no mapping will occur when the condition is false.
Else if: Perform an additional condition evaluation when the previous "If" condition is false.
When the mapping is complete, click OK.
Conditional Mapping Example
The following conditional mapping example checks to see if the Payload field has the value "server1." If this statement is true, then the value for service is mapped to the Description target field. If source is not "server1," then the altservice field is mapped to Description instead.
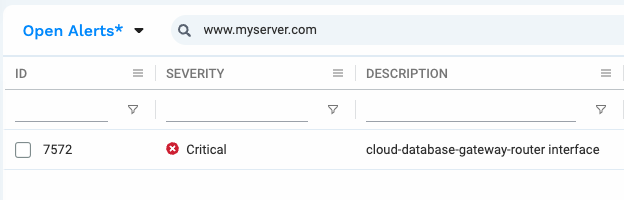
The alert looks like this when source equals "server1," with the Description field receiving its value from service.

In this alert, source does not equal "server1." In this situation, the "Else" section takes effect and altservice provides the value for Description.
